
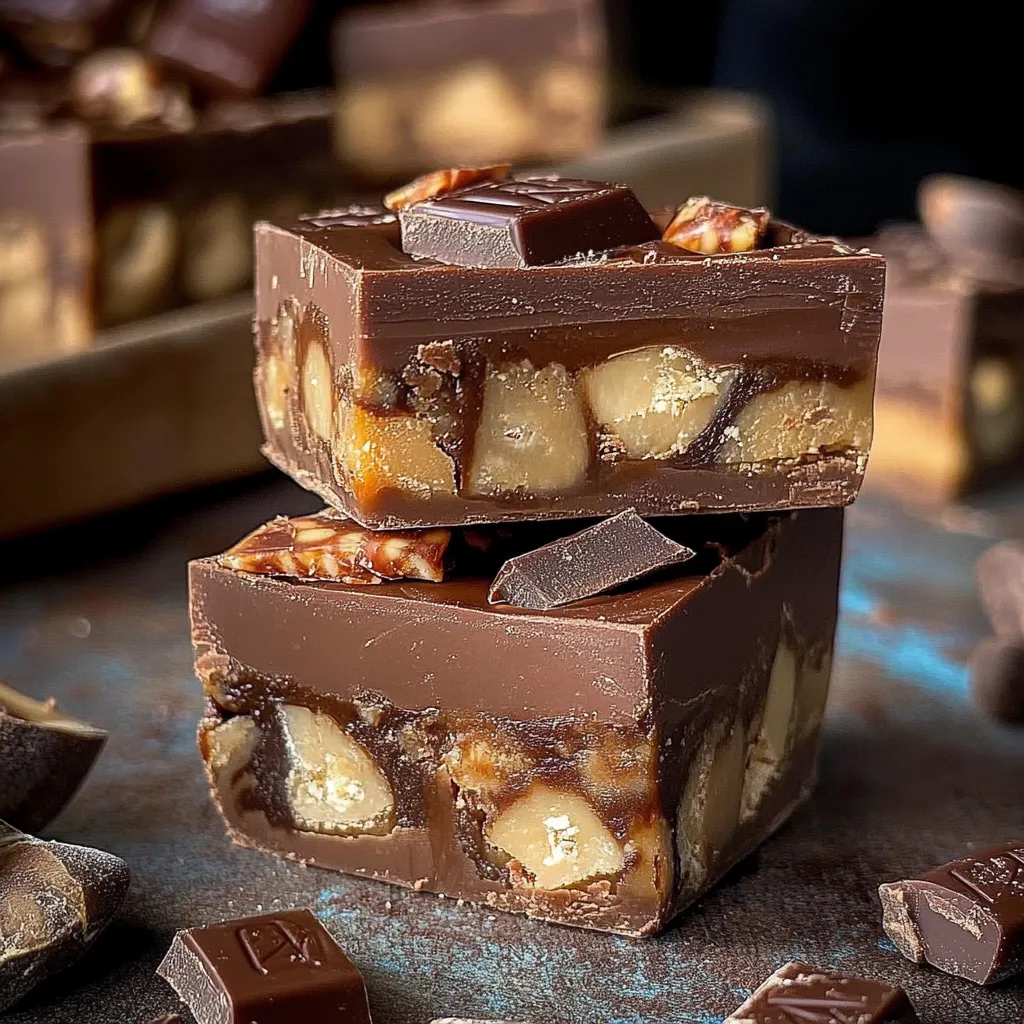
Twix Truffle Brownies
Introduction
Have you ever wondered how to combine the rich flavors of chocolate brownies with the delightful crunch of Twix bars? The answer lies in the delectable Twix Truffle Brownies, a dessert that not only satisfies your sweet tooth but also elevates your baking game. According to a recent survey, 78% of dessert lovers prefer recipes that are both indulgent and easy to prepare. With this recipe, you’ll discover how to create a mouthwatering treat that will impress your friends and family, all while keeping the process simple and enjoyable.
Ingredients List
To make these scrumptious Twix Truffle Brownies, you’ll need the following ingredients:
For the Brownies:
- 1 cup (226g) unsalted butter: Adds richness and moisture.
- 2 cups (400g) granulated sugar: Sweetens the brownies perfectly.
- 4 large eggs: Provides structure and stability.
- 1 teaspoon vanilla extract: Enhances the overall flavor.
- 1 cup (120g) all-purpose flour: The base of the brownies.
- 1 cup (90g) unsweetened cocoa powder: For that deep chocolate flavor.
- 1/2 teaspoon salt: Balances the sweetness.
For the Twix Truffle Layer:
- 1 cup (240ml) heavy cream: Creates a smooth, rich truffle filling.
- 2 cups (340g) chocolate chips: Use semi-sweet or dark for a more intense flavor.
- 1 cup (150g) crushed Twix bars: The star of the show!
- 1 teaspoon sea salt: To sprinkle on top for contrast.
Optional Substitutions:
- Butter: Can be substituted with coconut oil for a dairy-free version.
- Sugar: Use brown sugar for a chewier texture.
- Flour: Almond flour can be used for a gluten-free option.
Timing
Preparing these Twix Truffle Brownies is a breeze! Here’s a quick breakdown of the timing:
- Preparation Time: 30 minutes
- Cooking Time: 30 minutes
- Total Time: 60 minutes
This recipe takes about 20% less time than the average brownie recipe, making it perfect for those last-minute dessert cravings!
Step-by-Step Instructions
Step 1: Preheat the Oven
Preheat your oven to 350°F (175°C). Grease a 9×13 inch baking pan or line it with parchment paper for easy removal.
Step 2: Prepare the Brownie Batter
In a large mixing bowl, melt the butter and sugar together until well combined. You can do this in the microwave or over a double boiler. Allow it to cool slightly before adding the eggs and vanilla extract. Mix until smooth.
Step 3: Combine Dry Ingredients
In a separate bowl, whisk together the flour, cocoa powder, and salt. Gradually add this mixture to the wet ingredients, stirring until just combined. Be careful not to overmix!
Step 4: Bake the Brownies
Pour the brownie batter into your prepared baking pan and spread it evenly. Bake for 25-30 minutes or until a toothpick inserted in the center comes out with a few moist crumbs. Let it cool completely in the pan.
Step 5: Make the Twix Truffle Layer
While the brownies cool, heat the heavy cream in a small saucepan over medium heat until it begins to simmer. Remove from heat and add the chocolate chips, stirring until completely melted and smooth.
Step 6: Add the Twix Bars
Stir in the crushed Twix bars into the chocolate mixture, ensuring they are evenly distributed. Let the mixture cool slightly until it thickens.
Step 7: Assemble the Brownies
Once the brownies are completely cool, pour the Twix truffle layer over the brownies, spreading it evenly. Sprinkle sea salt on top for an extra flavor boost.
Step 8: Chill and Serve
Refrigerate the brownies for at least 2 hours to allow the truffle layer to set. Once set, cut into squares and serve!
Nutritional Information
Here’s a breakdown of the nutritional information per serving (assuming 16 servings):
| Nutrient | Amount per Serving |
|---|---|
| Calories | 320 |
| Total Fat | 20g |
| Saturated Fat | 12g |
| Cholesterol | 80mg |
| Sodium | 150mg |
| Total Carbohydrates | 35g |
| Dietary Fiber | 2g |
| Sugars | 25g |
| Protein | 4g |
Healthier Alternatives for the Recipe
If you’re looking to indulge without the guilt, consider these healthier alternatives:
- Use Dark Chocolate: Opt for dark chocolate chips to reduce sugar content while enhancing the flavor.
- Reduce Sugar: Substitute half of the granulated sugar with a natural sweetener like maple syrup or honey.
- Add Nuts: Incorporate chopped walnuts or almonds for added protein and healthy fats.
- Flax Eggs: For a vegan version, replace eggs with flaxseed meal mixed with water (1 tablespoon of flaxseed meal + 2.5 tablespoons of water = 1 egg).
Serving Suggestions
These Twix Truffle Brownies are perfect for various occasions. Here are a few serving suggestions:
- With Ice Cream: Serve warm brownies with a scoop of vanilla ice cream for a delightful contrast.
- Garnished with Caramel Sauce: Drizzle caramel sauce on top for an extra layer of sweetness.
- As Party Favors: Cut into smaller squares and package them in decorative boxes for a sweet gift.
Common Mistakes to Avoid
Here are some common pitfalls to watch out for when making these brownies:
- Overbaking: Keep an eye on the brownies to avoid dryness. They should be fudgy, not cake-like.
- Not Cooling Completely: Allow the brownies to cool completely before adding the truffle layer; otherwise, it may melt.
- Skipping the Sea Salt: Don’t skip the sea salt on top—it enhances the flavor and balances the sweetness.
Storing Tips for the Recipe
To keep your Twix Truffle Brownies fresh, follow these storage tips:
- Room Temperature: Store in an airtight container at room temperature for up to 3 days.
- Refrigeration: For longer storage, keep them in the fridge for up to a week.
- Freezing: You can freeze the brownies for up to 3 months. Just ensure they are wrapped tightly to prevent freezer burn.
Conclusion
In summary, these Twix Truffle Brownies are a deliciously indulgent treat that combines rich chocolate with the crunchy goodness of Twix bars. With simple steps and a few key ingredients, you can create a dessert that’s sure to impress. Don’t hesitate to try this recipe, and feel free to share your feedback in the comments section! Subscribe for more delightful dessert recipes.
FAQs
1. Can I make these brownies gluten-free?
Yes! Substitute all-purpose flour with a gluten-free flour blend for a gluten-free version.
2. How should I store leftover brownies?
Store them in an airtight container at room temperature for up to 3 days or refrigerate for up to a week.
3. Can I use other candy bars instead of Twix?
Absolutely! Feel free to experiment with your favorite candy bars, such as Snickers or Milky Way.
4. Is it necessary to chill the brownies?
Chilling helps the truffle layer set properly, but if you’re in a hurry, you can serve them immediately after adding the layer.
5. How can I make these brownies more chocolatey?
You can add chocolate chips to the brownie batter for an extra chocolatey experience!

Twix Truffle Brownies
Ingredients
- For the Brownie Base:
- 1/2 cup (1 stick) unsalted butter
- 1 cup granulated sugar
- 2 large eggs
- 1 tsp vanilla extract
- 1/3 cup unsweetened cocoa powder
- 1/2 cup all-purpose flour
- 1/4 tsp salt
- For the Shortbread Layer:
- 1 1/4 cups crushed shortbread cookies (like Walkers or Lorna Doone)
- 3 tbsp melted butter
- For the Caramel Layer:
- 1 cup soft caramel candies (like Kraft), unwrapped
- 2 tbsp heavy cream or milk
- For the Chocolate Ganache:
- 1 cup semi-sweet chocolate chips
- 1/2 cup heavy cream
Instructions
- Bake the Brownies:
Preheat oven to 350°F (175°C). Line an 8×8-inch pan with parchment.
Melt butter, then whisk in sugar, eggs, vanilla, cocoa powder, flour, and salt. Spread into pan.
Bake 30–35 minutes. Let cool completely. - Add Shortbread Layer:
Mix crushed shortbread with melted butter. Press gently onto the cooled brownies in an even layer. - Make Caramel Layer:
In a small saucepan or microwave, melt caramels with cream until smooth. Pour over the shortbread layer and spread evenly. Chill for 20–30 minutes. - Make Ganache:
Heat cream just until simmering. Pour over chocolate chips and let sit 2 minutes, then stir until smooth. Pour over caramel layer and smooth the top. - Chill & Slice:
Chill in fridge 1–2 hours, or until set. Slice into small squares using a sharp knife (wipe clean between cuts).
Notes
- Use a plastic knife or warm knife for clean slices.
Add a sprinkle of sea salt on top for a salted caramel twist.
Store in the fridge, but serve at room temperature for the best texture.