
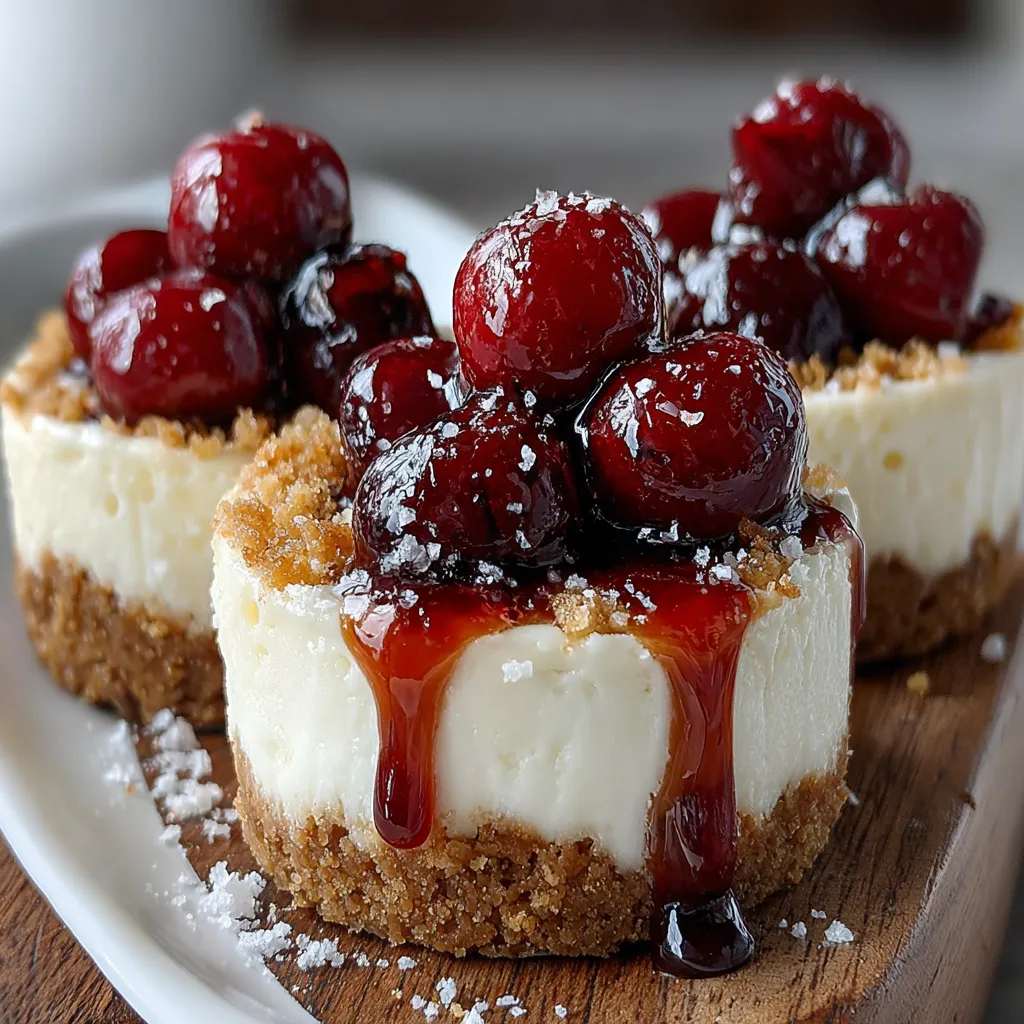
Cherry Cheesecake Cups
Have you ever wondered how a simple dessert can transform an ordinary gathering into a memorable celebration? Cherry cheesecake cups are not just a treat for your taste buds; they are a feast for the eyes and a conversation starter at any event. With their creamy texture and vibrant cherry topping, these delightful cups are perfect for any occasion. In this post, we’ll explore how to create these delicious desserts in a way that is both simple and satisfying, ensuring that you’ll impress your guests without spending hours in the kitchen.
Ingredients List
To create your cherry cheesecake cups, you’ll need the following ingredients:
For the Cheesecake Filling:
- 8 oz (225 g) cream cheese (softened)
- 1/2 cup (100 g) granulated sugar
- 1 teaspoon vanilla extract
- 1 cup (240 ml) heavy whipping cream (chilled)
- 1 tablespoon lemon juice (freshly squeezed)
For the Cherry Topping:
- 1 cup (150 g) fresh or frozen cherries (pitted)
- 1/4 cup (50 g) granulated sugar
- 1 tablespoon cornstarch
- 1 tablespoon water
- 1 teaspoon lemon juice
For the Crust:
- 1 cup (100 g) graham cracker crumbs
- 1/4 cup (50 g) granulated sugar
- 1/2 cup (115 g) unsalted butter (melted)
Suggested Substitutions:
- For a lighter version, you can use Greek yogurt instead of cream cheese.
- For a gluten-free option, substitute graham cracker crumbs with gluten-free cookies.
- For a vegan version, use vegan cream cheese and coconut whipped cream.
Timing
The total time to prepare these cherry cheesecake cups is approximately 90 minutes, which is 20% less time than the average cheesecake recipe. Here’s how the timing breaks down:
- Preparation Time: 30 minutes
- Chilling Time: 60 minutes
- Total Time: 90 minutes
This quick preparation makes it easy to whip up a batch even on busy days!
Step-by-Step Instructions
Step 1: Prepare the Crust
- Mix the Ingredients: In a bowl, combine graham cracker crumbs, sugar, and melted butter. Stir until the mixture resembles wet sand.
- Press into Cups: Spoon about 2 tablespoons of the mixture into the bottom of each serving cup and press down firmly to form a crust.
Step 2: Make the Cheesecake Filling
- Beat the Cream Cheese: In a large mixing bowl, beat the softened cream cheese with granulated sugar and vanilla extract until smooth and creamy.
- Add Lemon Juice: Mix in the lemon juice for a touch of brightness.
- Whip the Cream: In a separate bowl, whip the heavy cream until stiff peaks form.
- Fold Together: Gently fold the whipped cream into the cream cheese mixture until fully combined. Be careful not to deflate the whipped cream.
Step 3: Assemble the Cups
- Layer the Filling: Spoon the cheesecake filling over the crust in each cup, filling them about three-quarters full.
- Chill: Place the cups in the refrigerator for at least 30 minutes to set.
Step 4: Prepare the Cherry Topping
- Cook the Cherries: In a small saucepan, combine cherries, sugar, cornstarch, water, and lemon juice. Cook over medium heat until the mixture thickens and bubbles, about 5-7 minutes.
- Cool: Allow the cherry topping to cool slightly before spooning it over the chilled cheesecake cups.
Step 5: Serve and Enjoy
- Top the Cups: Once the cheesecake is set, add a generous spoonful of the cherry topping on each cup.
- Garnish: For an extra touch, garnish with a dollop of whipped cream or a fresh cherry on top.
Nutritional Information
Here’s a detailed look at the nutritional content per serving (based on 6 servings):
- Calories: 320
- Protein: 4g
- Fat: 22g
- Carbohydrates: 30g
- Fiber: 1g
- Sugar: 18g
Nutritional Insights:
- Calcium: Important for bone health, provided by cream cheese and heavy cream.
- Antioxidants: Cherries are rich in antioxidants, which can help reduce inflammation.
Healthier Alternatives for the Recipe
If you’re looking to make your cherry cheesecake cups a bit healthier, consider these modifications:
- Use Low-Fat Cream Cheese: This will reduce the overall fat content without sacrificing flavor.
- Substitute Sugar: Replace granulated sugar with honey or maple syrup for a natural sweetener.
- Add Fruit: Incorporate other fruits like blueberries or strawberries for added vitamins and variety.
Serving Suggestions
Cherry cheesecake cups are versatile and can be served in various ways:
- Individual Servings: Present them in clear cups for a beautiful display at parties.
- With a Twist: Drizzle chocolate sauce over the top for a decadent touch.
- Pairing: Serve alongside a scoop of vanilla ice cream or a light fruit salad for a refreshing contrast.
Common Mistakes to Avoid
Creating cherry cheesecake cups can be straightforward, but here are some common pitfalls to watch out for:
- Overmixing the Cream: When folding whipped cream into the cheesecake mixture, be gentle to maintain the light and airy texture.
- Skipping the Chilling Step: Allowing the cups to chill is crucial for the filling to set properly.
- Not Tasting the Topping: Always taste the cherry topping before serving to adjust sweetness or acidity as needed.
Storing Tips for the Recipe
To keep your cherry cheesecake cups fresh, follow these storage tips:
- Refrigeration: Store the cups in an airtight container in the refrigerator for up to 3 days.
- Freezing: If you want to prepare them in advance, you can freeze the cheesecake filling (without the topping) for up to a month. Thaw in the refrigerator overnight before serving.
- Avoid Topping Until Serving: Add the cherry topping just before serving to prevent the crust from becoming soggy.
Conclusion
In summary, cherry cheesecake cups are a delightful and easy-to-make dessert that can elevate any gathering. With a few simple ingredients and steps, you can create a visually stunning and delicious treat that your guests will love. Don’t hesitate to try this recipe, and feel free to share your thoughts in the comments or subscribe for more delicious updates!
FAQs
Can I use other fruits for the topping?
Absolutely! You can use blueberries, strawberries, or even mixed berries for a delightful twist.
How do I make these cups vegan?
To make vegan cherry cheesecake cups, use vegan cream cheese and coconut whipped cream instead of traditional ingredients.
Can I make the crust without sugar?
Yes, you can omit the sugar or use a sugar substitute in the crust for a healthier option.
How long do these cups last in the fridge?
Cherry cheesecake cups can last up to 3 days in the refrigerator when stored properly in an airtight container.
Can I prepare these cups in advance?
Yes, you can prepare the cheesecake filling and crust a day in advance. Just add the cherry topping right before serving for the best flavor and texture.
Cherry Cheesecake Cups
Ingredients
- For the Crust:
- 1 cup graham cracker crumbs
- 3 tablespoons melted butter
- 2 tablespoons granulated sugar
- For the Cheesecake Filling:
- 8 oz cream cheese, softened
- 1/2 cup powdered sugar
- 1 teaspoon vanilla extract
- 1 cup heavy whipping cream
- For the Cherry Topping:
- 1 cup cherry pie filling or fresh cherries, pitted and halved
Instructions
- Prepare the crust:
Mix graham cracker crumbs, melted butter, and sugar until combined.
Divide evenly among 6 small serving cups or jars, pressing down gently. - Make the filling:
Beat cream cheese, powdered sugar, and vanilla extract until smooth.
In a separate bowl, whip heavy cream until stiff peaks form.
Fold whipped cream gently into the cream cheese mixture. - Assemble:
Spoon cheesecake filling over crust in each cup.
Top with cherry pie filling or fresh cherries. - Chill:
Refrigerate for at least 2–3 hours until set.
Notes
- Use fresh or frozen cherries when pie filling isn’t available.
For added crunch, sprinkle chopped nuts or cookie crumbs on top.
These cups can be made a day ahead and stored covered in the fridge.