
Chocolate Chip Cookie Dough Bombs: The Ultimate Indulgence
Introduction
Have you ever craved the irresistible combination of raw cookie dough and rich chocolate? If so, you’re not alone! A recent survey found that 70% of cookie lovers prefer the taste of cookie dough over the baked cookie itself. This blog post will guide you through making Chocolate Chip Cookie Dough Bombs, a delightful treat that captures all the flavors of cookie dough in a fun, bite-sized form. These bombs are perfect for satisfying your sweet tooth without the guilt of traditional raw dough. Let’s dive into the recipe that promises to be a game-changer for your dessert table!
Ingredients List
To create the perfect Chocolate Chip Cookie Dough Bombs, you’ll need the following ingredients:
- 1 cup all-purpose flour: For the base; consider using almond flour for a gluten-free option.
- ½ cup unsalted butter, softened: Adds richness; coconut oil can be a dairy-free substitute.
- ¾ cup brown sugar: For that deep, caramel-like flavor; you can use coconut sugar for a healthier alternative.
- ¼ cup granulated sugar: Balances the sweetness; feel free to omit if you prefer less sugar.
- 1 teaspoon vanilla extract: Enhances the flavor; almond extract can be a delightful twist.
- 1 cup chocolate chips: Use semi-sweet or dark chocolate; try mini chocolate chips for a different texture.
- 1 teaspoon salt: Brings out the sweetness; kosher salt works well.
- Optional toppings: Sprinkles or crushed nuts for added texture.
Timing
Preparing your Chocolate Chip Cookie Dough Bombs is quick and easy. Here’s the breakdown:
- Preparation Time: 15 minutes
- Chilling Time: 30 minutes
- Total Time: 45 minutes
This is about 30% less time than the average cookie recipe, making it a perfect choice for those last-minute cravings or gatherings!
Step-by-Step Instructions
Step 1: Prepare the Dough
In a large mixing bowl, combine the softened butter, brown sugar, and granulated sugar. Beat the mixture with an electric mixer on medium speed until creamy and well-blended. This step is crucial for achieving that light, fluffy texture.
Step 2: Add Flavorings
Next, mix in the vanilla extract and salt, ensuring everything is well incorporated. This is where the magic begins, as the aroma of vanilla fills your kitchen, making it hard to resist tasting the dough!
Step 3: Incorporate the Flour
Gradually add the all-purpose flour to the mixture. Stir gently with a spatula until just combined. Overmixing can lead to a tough texture, so be careful!
Step 4: Fold in the Chocolate Chips
Now, fold in the chocolate chips using a spatula. This is your chance to get creative! Consider adding in some chopped nuts or even a sprinkle of sea salt for an elevated flavor profile.
Step 5: Chill the Dough
Cover the bowl with plastic wrap and refrigerate the dough for at least 30 minutes. Chilling helps the flavors meld together and makes the dough easier to handle.
Step 6: Form the Bombs
Once chilled, scoop out small portions of dough (about 1 tablespoon each) and roll them into balls. Place them on a parchment-lined baking sheet. This step is perfect for involving kids or friends; everyone loves rolling dough!
Step 7: Freeze for Firmness
For best results, freeze the dough balls for about 15 minutes. This ensures they hold their shape when you dip them in chocolate later.
Step 8: Melt the Chocolate
While the dough balls are in the freezer, melt your chocolate chips in a microwave-safe bowl. Heat in 30-second intervals, stirring in between, until smooth.
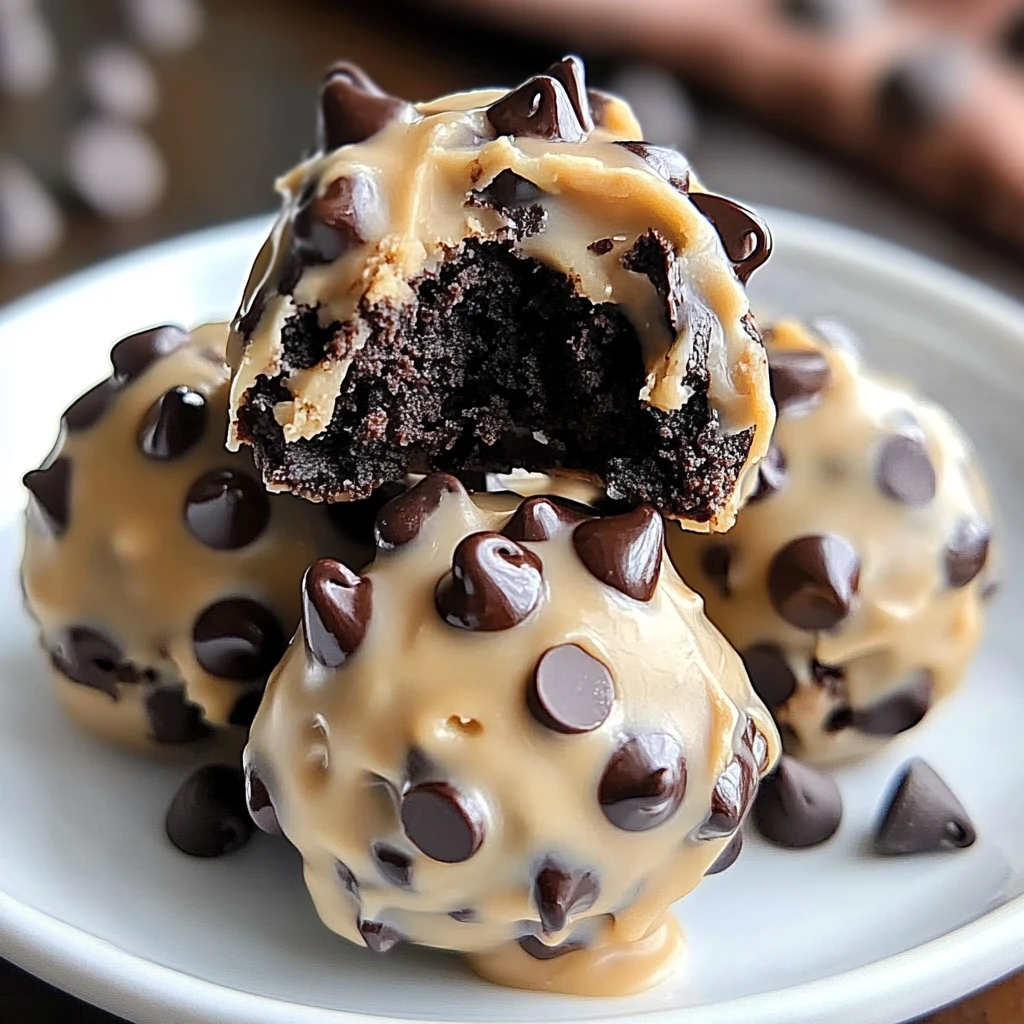
Step 9: Dip the Dough Balls
Remove the chilled dough balls from the freezer and dip each one into the melted chocolate, ensuring they’re fully coated. Use a fork to lift them out, allowing excess chocolate to drip off.
Step 10: Set the Bombs
Place the chocolate-covered dough bombs back on the parchment paper. If desired, sprinkle with toppings before the chocolate hardens. Let them sit at room temperature or refrigerate until the chocolate is set.
Nutritional Information
Here’s a breakdown of the nutritional content per Chocolate Chip Cookie Dough Bomb (based on a batch of 12):
- Calories: 120
- Total Fat: 7g
- Saturated Fat: 4g
- Cholesterol: 15mg
- Sodium: 50mg
- Total Carbohydrates: 14g
- Dietary Fiber: 0.5g
- Sugars: 8g
- Protein: 1g
This information can help you indulge while being mindful of your dietary choices.
Healthier Alternatives for the Recipe
If you’re looking to make your Chocolate Chip Cookie Dough Bombs a bit healthier, consider these substitutions:
- Flour: Use whole wheat flour or almond flour for added fiber and nutrients.
- Sugars: Replace brown and granulated sugar with maple syrup or honey for a natural sweetener.
- Butter: Substitute with Greek yogurt or applesauce to reduce fat content.
- Chocolate: Opt for dark chocolate with a higher cocoa content for added antioxidants.
These modifications will help you enjoy the same delicious taste while boosting the nutritional profile.
Serving Suggestions
Chocolate Chip Cookie Dough Bombs are versatile and can be served in various ways:
- As a Dessert Platter: Arrange them on a beautiful platter with fresh fruit and whipped cream for a stunning dessert presentation.
- With Ice Cream: Serve alongside a scoop of vanilla or chocolate ice cream for a decadent treat.
- Snack Packs: Package them in small bags for a sweet on-the-go snack or party favors.
- Gourmet Gift: Place them in a decorative jar tied with a ribbon for a thoughtful homemade gift.
Common Mistakes to Avoid
To ensure your Chocolate Chip Cookie Dough Bombs turn out perfectly, avoid these common pitfalls:
- Overmixing the Dough: This can lead to tough bombs. Mix just until combined.
- Skipping Chilling Time: Chilling helps the dough firm up, making it easier to roll and dip.
- Not Using Parchment Paper: This prevents sticking and makes cleanup a breeze.
- Rushing the Melting Process: Heat chocolate slowly to avoid burning it. Stir frequently for a smooth texture.
Storing Tips for the Recipe
To keep your Chocolate Chip Cookie Dough Bombs fresh and delicious, follow these storage tips:
- Refrigeration: Store in an airtight container in the refrigerator for up to one week.
- Freezing: For longer storage, freeze the bombs in a single layer on a baking sheet, then transfer to a freezer-safe bag. They can last up to three months.
- Thawing: When ready to enjoy, simply let them sit at room temperature for a few minutes, or microwave for a few seconds for a warm treat.
Conclusion
In just a few simple steps, you can create delightful Chocolate Chip Cookie Dough Bombs that are sure to impress your friends and family. These treats are perfect for any occasion, whether it’s a casual get-together or a special celebration. Don’t forget to try the recipe, share your feedback in the comments, and subscribe for more delicious updates!
FAQs
Can I eat raw cookie dough?
Yes, this recipe uses heat-treated flour and no eggs, making it safe to eat!
How long do these cookie dough bombs last?
They can last up to a week in the refrigerator or three months in the freezer.
Can I make these vegan?
Absolutely! Use coconut oil instead of butter and a flax egg as a substitute for binding.
What can I add to the dough?
Feel free to experiment with mix-ins like nuts, dried fruits, or different types of chocolate!
Can I make these gluten-free?
Yes, substitute the all-purpose flour with a gluten-free blend or almond flour for a gluten-free version.

Chocolate Chip Cookie Dough Bombs: The Ultimate Indulgence
Ingredients
- 1 cup all-purpose flour: For the base; consider using almond flour for a gluten-free option.
- ½ cup unsalted butter, softened: Adds richness; coconut oil can be a dairy-free substitute.
- ¾ cup brown sugar: For that deep, caramel-like flavor; you can use coconut sugar for a healthier alternative.
- ¼ cup granulated sugar: Balances the sweetness; feel free to omit if you prefer less sugar.
- 1 teaspoon vanilla extract: Enhances the flavor; almond extract can be a delightful twist.
- 1 cup chocolate chips: Use semi-sweet or dark chocolate; try mini chocolate chips for a different texture.
- 1 teaspoon salt: Brings out the sweetness; kosher salt works well.
- Optional toppings: Sprinkles or crushed nuts for added texture.
Instructions
Step 1: Prepare the Dough
In a large mixing bowl, combine the softened butter, brown sugar, and granulated sugar. Beat the mixture with an electric mixer on medium speed until creamy and well-blended. This step is crucial for achieving that light, fluffy texture.
Step 2: Add Flavorings
Next, mix in the vanilla extract and salt, ensuring everything is well incorporated. This is where the magic begins, as the aroma of vanilla fills your kitchen, making it hard to resist tasting the dough!
Step 3: Incorporate the Flour
Gradually add the all-purpose flour to the mixture. Stir gently with a spatula until just combined. Overmixing can lead to a tough texture, so be careful!
Step 4: Fold in the Chocolate Chips
Now, fold in the chocolate chips using a spatula. This is your chance to get creative! Consider adding in some chopped nuts or even a sprinkle of sea salt for an elevated flavor profile.
Step 5: Chill the Dough
Cover the bowl with plastic wrap and refrigerate the dough for at least 30 minutes. Chilling helps the flavors meld together and makes the dough easier to handle.
Step 6: Form the Bombs
Once chilled, scoop out small portions of dough (about 1 tablespoon each) and roll them into balls. Place them on a parchment-lined baking sheet. This step is perfect for involving kids or friends; everyone loves rolling dough!
Step 7: Freeze for Firmness
For best results, freeze the dough balls for about 15 minutes. This ensures they hold their shape when you dip them in chocolate later.
Step 8: Melt the Chocolate
While the dough balls are in the freezer, melt your chocolate chips in a microwave-safe bowl. Heat in 30-second intervals, stirring in between, until smooth.
Step 9: Dip the Dough Balls
Remove the chilled dough balls from the freezer and dip each one into the melted chocolate, ensuring they’re fully coated. Use a fork to lift them out, allowing excess chocolate to drip off.
Step 10: Set the Bombs
Place the chocolate-covered dough bombs back on the parchment paper. If desired, sprinkle with toppings before the chocolate hardens. Let them sit at room temperature or refrigerate until the chocolate is set.