
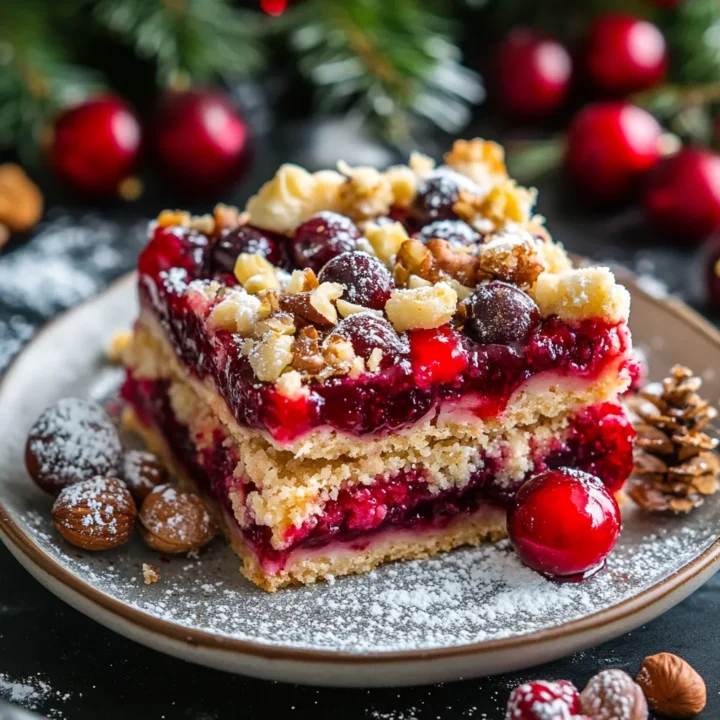
Christmas Cherry Dessert Bars: A Festive Treat for the Holidays
Introduction
Are you looking for a festive dessert that combines ease of preparation with delightful flavor? Christmas Cherry Dessert Bars might just be the perfect solution! These bars not only capture the essence of the holiday season with their vibrant colors and rich taste, but they also take less time to prepare than many traditional desserts. In fact, did you know that these bars can be made in under 90 minutes, which is approximately 20% less time than the average holiday dessert recipe? Let’s dive into this delectable treat that will surely impress your family and friends!
Ingredients List
To create your Christmas Cherry Dessert Bars, gather the following ingredients:
For the Bars:
- 1 cup all-purpose flour: Provides the base for the bars.
- 1/2 cup granulated sugar: Sweetens the mixture.
- 1/4 cup unsalted butter, softened: Adds richness and moisture.
- 1 large egg: Binds the ingredients together.
- 1 teaspoon vanilla extract: Enhances the flavor.
- 1/2 teaspoon baking powder: Helps the bars rise.
- 1/4 teaspoon salt: Balances the sweetness.
- 1 cup cherry pie filling: The star ingredient, providing a burst of flavor.
For the Topping:
- 1/2 cup powdered sugar: For sweetness and decoration.
- 1 tablespoon milk: To create a smooth glaze.
- Optional: Chopped nuts or coconut for added texture.
Substitutions:
- For a gluten-free version, use almond flour or a gluten-free all-purpose blend.
- Swap out cherry pie filling for other fruit fillings like blueberry, raspberry, or even pumpkin for a seasonal twist.
Timing
Preparing these Christmas Cherry Dessert Bars is a breeze! Here’s a breakdown of the timing:
- Preparation Time: 15 minutes
- Cooking Time: 30 minutes
- Cooling Time: 45 minutes
- Total Time: 90 minutes
This is a significant time-saver compared to many other holiday desserts, making it an ideal choice for busy cooks!
Step-by-Step Instructions
Step 1: Preheat the Oven
Preheat your oven to 350°F (175°C). This ensures that your bars bake evenly.
Step 2: Prepare the Baking Dish
Grease an 8×8-inch baking dish or line it with parchment paper for easy removal later. This step is crucial for preventing sticking.
Step 3: Mix the Base
In a mixing bowl, combine the flour, granulated sugar, baking powder, and salt. In another bowl, mix the softened butter, egg, and vanilla extract until well blended. Gradually add the dry ingredients to the wet mixture until just combined. Don’t overmix!

Step 4: Spread the Mixture
Pour the batter into the prepared baking dish, spreading it evenly. This layer will form the base of your bars.
Step 5: Add the Cherry Filling
Spoon the cherry pie filling over the batter, spreading it gently to ensure even distribution. The cherries will create a lovely contrast in flavor and color.
Step 6: Bake
Place the dish in the preheated oven and bake for 30 minutes, or until the edges are golden brown and a toothpick inserted in the center comes out clean.
Step 7: Cool and Glaze
Once baked, remove the dish from the oven and let it cool for about 45 minutes. Meanwhile, whisk together the powdered sugar and milk to create a smooth glaze. Drizzle this over the cooled bars for a festive touch.
Step 8: Slice and Serve
Once completely cooled, slice the bars into squares. Serve them on a festive platter, garnished with nuts or coconut if desired.
Nutritional Information
These Christmas Cherry Dessert Bars not only taste great but can also fit into a balanced diet. Here’s a breakdown of the nutritional information per serving (based on 16 servings):
- Calories: 150
- Total Fat: 5g
- Saturated Fat: 3g
- Cholesterol: 20mg
- Sodium: 80mg
- Total Carbohydrates: 24g
- Dietary Fiber: 0.5g
- Sugars: 10g
- Protein: 2g
Nutritional Insights
- Low in Calories: Compared to many holiday desserts, these bars are relatively low in calories, making them a guilt-free indulgence.
- Rich in Flavor: The use of cherry pie filling adds antioxidants, providing a nutritional boost.
Healthier Alternatives for the Recipe
If you’re looking to make these bars even healthier, consider these modifications:
- Sugar Alternatives: Use coconut sugar or a sugar substitute to reduce the glycemic index.
- Whole Wheat Flour: Swap all-purpose flour for whole wheat flour for added fiber.
- Reduced-Fat Butter: Use a light butter or applesauce to cut down on fat content without sacrificing moisture.
Serving Suggestions
These Christmas Cherry Dessert Bars are versatile and can be served in various ways:
- Festive Platter: Arrange the bars on a holiday-themed platter with fresh cherries and mint leaves for a pop of color.
- À la Mode: Serve warm with a scoop of vanilla ice cream or whipped cream for a delightful contrast.
- Coffee Pairing: These bars pair wonderfully with a cup of coffee or hot cocoa, making them a perfect afternoon treat.
Common Mistakes to Avoid
To ensure your Christmas Cherry Dessert Bars turn out perfectly, here are some common pitfalls to avoid:
- Overmixing the Batter: This can lead to dense bars. Mix until just combined.
- Skipping the Cooling Time: Cutting the bars too early can result in a messy presentation. Allow them to cool completely.
- Not Greasing the Pan: This can cause sticking. Always grease or line your baking dish.
Storing Tips for the Recipe
To keep your Christmas Cherry Dessert Bars fresh:
- Room Temperature: Store in an airtight container at room temperature for up to 3 days.
- Refrigeration: For longer storage, refrigerate for up to a week. Just be sure to let them come to room temperature before serving.
- Freezing: These bars freeze well! Wrap them individually in plastic wrap and store in a freezer-safe container for up to 3 months. Thaw in the refrigerator before serving.
Conclusion
In summary, these Christmas Cherry Dessert Bars are a delightful, easy-to-make treat that embodies the spirit of the holidays. With their vibrant flavors and festive appearance, they are sure to become a favorite in your holiday repertoire. Try this recipe today, and don’t forget to share your thoughts in the comments below! For more delicious recipes and updates, subscribe to our blog!
FAQs
Can I use fresh cherries instead of pie filling?
Yes, you can use fresh cherries, but you may need to add sugar and cornstarch to mimic the sweetness and thickness of pie filling.
How can I make these bars vegan?
Substitute the egg with a flaxseed egg (1 tablespoon of ground flaxseed mixed with 2.5 tablespoons of water) and use a plant-based butter.
What can I serve with these bars?
These bars are delicious on their own but also pair well with ice cream, whipped cream, or a drizzle of chocolate sauce.
How do I know when the bars are done baking?
The edges should be golden brown, and a toothpick inserted in the center should come out clean.
Can I make these bars ahead of time?
Absolutely! These bars can be made a day in advance and stored in an airtight container until you’re ready to serve.
Christmas Cherry Dessert Bars: A Festive Treat for the Holidays
Ingredients
- For the Bars:
- 1 cup all-purpose flour: Provides the base for the bars.
- 1/2 cup granulated sugar: Sweetens the mixture.
- 1/4 cup unsalted butter, softened: Adds richness and moisture.
- 1 large egg: Binds the ingredients together.
- 1 teaspoon vanilla extract: Enhances the flavor.
- 1/2 teaspoon baking powder: Helps the bars rise.
- 1/4 teaspoon salt: Balances the sweetness.
- 1 cup cherry pie filling: The star ingredient, providing a burst of flavor.
- For the Topping:
- 1/2 cup powdered sugar: For sweetness and decoration.
- 1 tablespoon milk: To create a smooth glaze.
- Optional: Chopped nuts or coconut for added texture.
Instructions
Step 1: Preheat the Oven
Preheat your oven to 350°F (175°C). This ensures that your bars bake evenly.
Step 2: Prepare the Baking Dish
Grease an 8x8-inch baking dish or line it with parchment paper for easy removal later. This step is crucial for preventing sticking.
Step 3: Mix the Base
In a mixing bowl, combine the flour, granulated sugar, baking powder, and salt. In another bowl, mix the softened butter, egg, and vanilla extract until well blended. Gradually add the dry ingredients to the wet mixture until just combined. Don’t overmix!
Step 4: Spread the Mixture
Pour the batter into the prepared baking dish, spreading it evenly. This layer will form the base of your bars.
Step 5: Add the Cherry Filling
Spoon the cherry pie filling over the batter, spreading it gently to ensure even distribution. The cherries will create a lovely contrast in flavor and color.
Step 6: Bake
Place the dish in the preheated oven and bake for 30 minutes, or until the edges are golden brown and a toothpick inserted in the center comes out clean.
Step 7: Cool and Glaze
Once baked, remove the dish from the oven and let it cool for about 45 minutes. Meanwhile, whisk together the powdered sugar and milk to create a smooth glaze. Drizzle this over the cooled bars for a festive touch.
Step 8: Slice and Serve
Once completely cooled, slice the bars into squares. Serve them on a festive platter, garnished with nuts or coconut if desired.