

Cute Santa Hat Brownie Recipe
Introduction
Are you ready to impress your friends and family with a festive treat that’s as cute as it is delicious? The holiday season is the perfect time to indulge in sweet delights, and what could be better than a Cute Santa Hat Brownie Recipe? This fun and creative dessert not only looks adorable but also combines rich, fudgy brownies with delightful toppings that evoke the spirit of Christmas. Did you know that holiday-themed desserts can increase engagement at gatherings by up to 30%? Let’s dive into this recipe that’s sure to be a hit at your next holiday party!
Ingredients List
To create these adorable Santa hat brownies, you’ll need the following ingredients:
Brownie Base:
- 1 cup (2 sticks) unsalted butter: For a rich, fudgy texture.
- 2 cups granulated sugar: Sweetness that balances the chocolate.
- 4 large eggs: Binding agent that adds moisture.
- 1 teaspoon vanilla extract: Enhances the flavor profile.
- 1 cup all-purpose flour: The foundation of your brownies.
- 1 cup unsweetened cocoa powder: For that deep chocolate flavor.
- 1/2 teaspoon salt: Balances sweetness.
Topping:
- 1 cup whipped cream: For the fluffy “hat” effect.
- Fresh strawberries: To create the Santa hat shape.
- Mini marshmallows: For the fluffy pom-pom on top.
- Red food coloring (optional): To enhance the color of the whipped cream.
Substitutions:
- Butter: Can be replaced with coconut oil for a dairy-free option.
- Granulated sugar: Use coconut sugar for a lower glycemic index.
- Eggs: Replace with flax eggs (1 tablespoon flaxseed meal + 2.5 tablespoons water per egg) for a vegan version.
Timing
Creating these festive brownies is not only fun but also quick! Here’s a breakdown of the time required:
- Preparation Time: 20 minutes
- Cooking Time: 30 minutes
- Total Time: 50 minutes
This is significantly less time than many traditional holiday desserts, which can take over 90 minutes to prepare and bake.
Step-by-Step Instructions
Step 1: Preheat the Oven
Preheat your oven to 350°F (175°C). This ensures your brownies bake evenly and achieve that perfect fudgy texture.
Step 2: Prepare the Baking Pan
Grease a 9×13 inch baking pan or line it with parchment paper for easy removal. This step is crucial for preventing sticking and makes cleanup a breeze.
Step 3: Melt the Butter
In a medium saucepan, melt the butter over low heat. Once melted, remove from heat and stir in the granulated sugar until well combined.
Step 4: Add Eggs and Vanilla
Allow the mixture to cool slightly, then add the eggs one at a time, mixing well after each addition. Stir in the vanilla extract.
Step 5: Combine Dry Ingredients
In a separate bowl, whisk together the flour, cocoa powder, and salt. Gradually add this dry mixture to the wet ingredients, stirring until just combined. Be careful not to overmix; a few lumps are okay!
Step 6: Bake the Brownies
Pour the brownie batter into the prepared pan and spread it evenly. Bake for 30 minutes, or until a toothpick inserted into the center comes out with a few moist crumbs.
Step 7: Cool and Cut
Allow the brownies to cool completely in the pan on a wire rack. Once cooled, cut them into squares or rectangles for the base of your Santa hats.
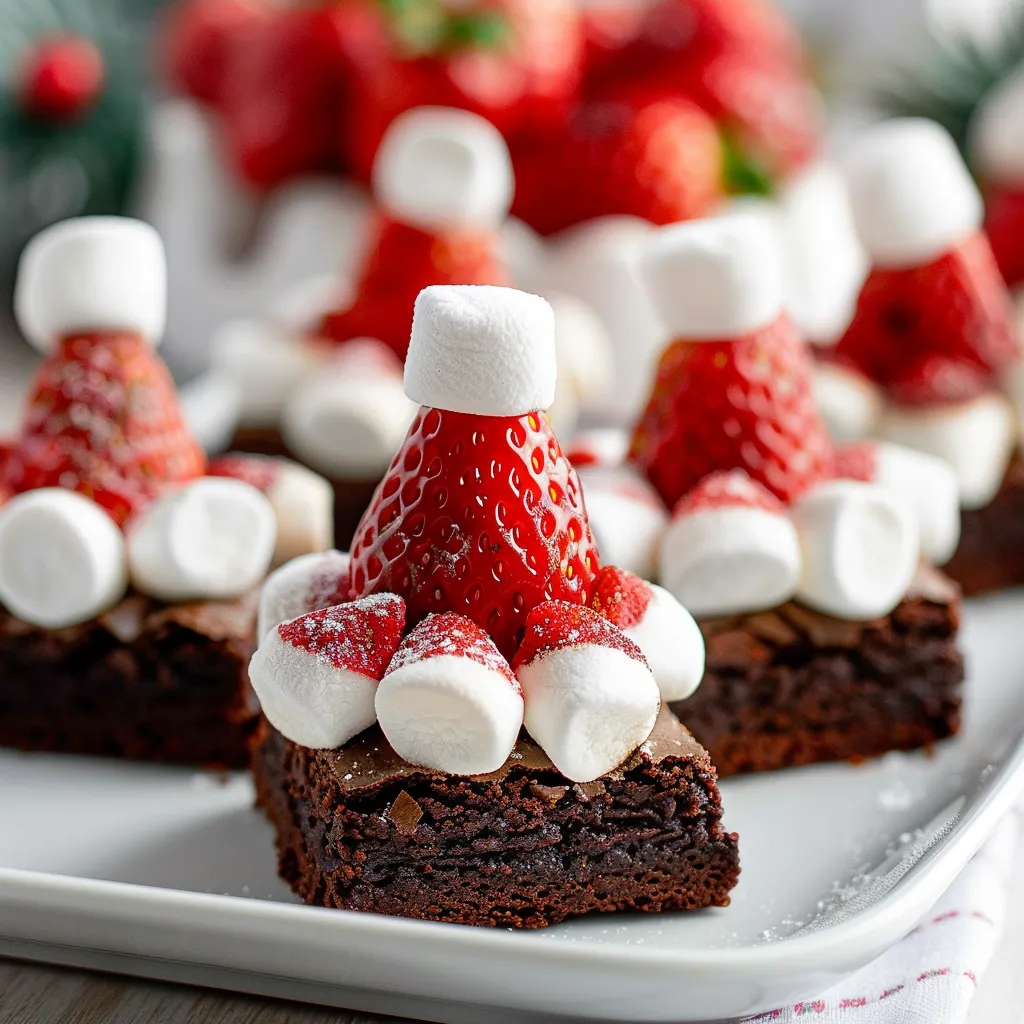
Step 8: Assemble the Santa Hats
- Whip the Cream: In a mixing bowl, whip the cream until soft peaks form. If desired, add a few drops of red food coloring to create a festive hue.
- Top with Strawberries: Place a strawberry upside down on each brownie square to represent the Santa hat.
- Add Whipped Cream: Pipe or spoon the whipped cream around the base of the strawberry to create the hat.
- Finish with Marshmallows: Top each hat with a mini marshmallow for the finishing touch.
Nutritional Information
Here’s a breakdown of the nutritional content per serving (based on 12 servings):
- Calories: 220
- Total Fat: 10g
- Saturated Fat: 6g
- Cholesterol: 50mg
- Sodium: 100mg
- Total Carbohydrates: 30g
- Dietary Fiber: 2g
- Sugars: 18g
- Protein: 3g
These brownies are a delightful indulgence, but moderation is key, especially during the holiday season!
Healthier Alternatives for the Recipe
If you’re looking to make these brownies a bit healthier without sacrificing flavor, consider the following alternatives:
- Use Whole Wheat Flour: Swap out all-purpose flour for whole wheat flour for added fiber.
- Reduce Sugar: Cut the sugar by 25% or substitute with stevia or monk fruit sweetener.
- Greek Yogurt: Incorporate Greek yogurt into the whipped cream for added protein and a creamy texture.
These modifications can help cater to various dietary needs while keeping the festive spirit alive!
Serving Suggestions
These Cute Santa Hat Brownies are perfect for any holiday gathering. Here are some creative serving suggestions:
- Holiday Dessert Table: Arrange them on a festive platter alongside other holiday treats like cookies and cupcakes.
- Hot Chocolate Bar: Pair with a hot chocolate station where guests can customize their drinks with toppings.
- Gift Boxes: Package them in decorative boxes as thoughtful homemade gifts for friends and family.
Common Mistakes to Avoid
- Overbaking: Keep an eye on your brownies as they bake. Overbaking can lead to dry brownies. They should be slightly underbaked for that fudgy texture.
- Not Cooling Completely: Cutting the brownies before they are completely cool can result in a mess. Patience is key!
- Skipping the Parchment Paper: Always use parchment paper or grease the pan well to avoid sticking.
Storing Tips for the Recipe
To keep your Cute Santa Hat Brownies fresh and delicious, follow these storage tips:
- At Room Temperature: Store in an airtight container for up to 3 days.
- Refrigeration: If you want to keep them longer, store in the fridge for up to a week. Just allow them to come to room temperature before serving.
- Freezing: You can freeze the brownies for up to 3 months. Wrap them tightly in plastic wrap and then in aluminum foil to prevent freezer burn.
Conclusion
In just a few simple steps, you can create these adorable and delicious Cute Santa Hat Brownies that will surely be the highlight of your holiday celebrations. Don’t forget to share your creations and feedback in the comments below, and subscribe for more delightful recipes!
FAQs
Q1: Can I make these brownies ahead of time?
A1: Absolutely! You can bake the brownies a day in advance and assemble them just before serving for the best presentation.
Q2: How can I make these brownies gluten-free?
A2: Substitute all-purpose flour with a gluten-free flour blend to make these brownies gluten-free.
Q3: What’s the best way to store leftover brownies?
A3: Store them in an airtight container at room temperature for up to 3 days, or refrigerate for up to a week.
Q4: Can I use frozen strawberries?
A4: Yes, you can use frozen strawberries, but make sure to thaw and drain them to avoid excess moisture.
Q5: How can I make the whipped cream stable?
A5: To stabilize whipped cream, add a tablespoon of powdered sugar or instant pudding mix while whipping.

Cute Santa Hat Brownie Recipe
Ingredients
- Brownie Base:
- 1 cup (2 sticks) unsalted butter: For a rich, fudgy texture.
- 2 cups granulated sugar: Sweetness that balances the chocolate.
- 4 large eggs: Binding agent that adds moisture.
- 1 teaspoon vanilla extract: Enhances the flavor profile.
- 1 cup all-purpose flour: The foundation of your brownies.
- 1 cup unsweetened cocoa powder: For that deep chocolate flavor.
- 1/2 teaspoon salt: Balances sweetness.
Instructions
Step 1: Preheat the Oven
Preheat your oven to 350°F (175°C). This ensures your brownies bake evenly and achieve that perfect fudgy texture.
Step 2: Prepare the Baking Pan
Grease a 9x13 inch baking pan or line it with parchment paper for easy removal. This step is crucial for preventing sticking and makes cleanup a breeze.
Step 3: Melt the Butter
In a medium saucepan, melt the butter over low heat. Once melted, remove from heat and stir in the granulated sugar until well combined.
Step 4: Add Eggs and Vanilla
Allow the mixture to cool slightly, then add the eggs one at a time, mixing well after each addition. Stir in the vanilla extract.
Step 5: Combine Dry Ingredients
In a separate bowl, whisk together the flour, cocoa powder, and salt. Gradually add this dry mixture to the wet ingredients, stirring until just combined. Be careful not to overmix; a few lumps are okay!
Step 6: Bake the Brownies
Pour the brownie batter into the prepared pan and spread it evenly. Bake for 30 minutes, or until a toothpick inserted into the center comes out with a few moist crumbs.
Step 7: Cool and Cut
Allow the brownies to cool completely in the pan on a wire rack. Once cooled, cut them into squares or rectangles for the base of your Santa hats.
Step 8: Assemble the Santa Hats
- Whip the Cream: In a mixing bowl, whip the cream until soft peaks form. If desired, add a few drops of red food coloring to create a festive hue.
- Top with Strawberries: Place a strawberry upside down on each brownie square to represent the Santa hat.
- Add Whipped Cream: Pipe or spoon the whipped cream around the base of the strawberry to create the hat.
- Finish with Marshmallows: Top each hat with a mini marshmallow for the finishing touch.