
No-Bake Biscoff Cheesecake Cups
Introduction
Have you ever wondered how to create a dessert that is both indulgent and incredibly easy to make? If you’re a fan of creamy cheesecakes and the delightful flavor of Biscoff cookies, you’re in for a treat! Today, we’ll explore a delicious recipe for No-Bake Biscoff Cheesecake Cups that not only satisfies your sweet tooth but also takes less time than many traditional cheesecake recipes. With this no-bake version, you can whip up these delightful cups in just 90 minutes—20% less time than the average cheesecake! Let’s dive into this easy, delectable dessert that’s perfect for any occasion.
Ingredients List
Creating your No-Bake Biscoff Cheesecake Cups requires just a handful of ingredients, each contributing to the rich flavor and creamy texture. Here’s what you’ll need:
- For the Cheesecake Filling:
- 8 oz (225g) cream cheese, softened
- 1 cup (240ml) heavy whipping cream
- 1/2 cup (60g) powdered sugar
- 1/2 cup (120g) Biscoff spread
- 1 tsp vanilla extract
- For the Biscoff Crust:
- 1 cup (120g) Biscoff cookies, crushed
- 4 tbsp (60g) unsalted butter, melted
- For Topping:
- Additional Biscoff cookies for garnish
- Optional: chocolate shavings or whipped cream for extra flair
Substitutions:
- Use Greek yogurt instead of cream cheese for a lighter option.
- Swap out Biscoff spread for Nutella or any other cookie butter for a different flavor profile.
Timing
Preparation for these No-Bake Biscoff Cheesecake Cups is a breeze! Here’s a breakdown of the time required:
- Preparation Time: 20 minutes
- Chilling Time: 70 minutes
- Total Time: 90 minutes
This is significantly quicker than many baked cheesecake recipes, which often require hours of cooling and baking time.
Step-by-Step Instructions
Step 1: Prepare the Crust
- Crush the Cookies: In a food processor, pulse the Biscoff cookies until finely crushed. You can also place them in a zip-top bag and crush them with a rolling pin if you prefer a more hands-on approach.
- Mix with Butter: In a medium bowl, combine the crushed cookies with melted butter. Stir until the mixture resembles wet sand.
- Form the Base: Divide the crust mixture evenly among serving cups or jars, pressing it down firmly to create a solid base. Set aside while you prepare the filling.
Step 2: Make the Cheesecake Filling
- Whip the Cream: In a large mixing bowl, whip the heavy cream until stiff peaks form. This will give your cheesecake a light and airy texture.
- Combine Ingredients: In another bowl, beat the softened cream cheese, powdered sugar, Biscoff spread, and vanilla extract until smooth and creamy.
- Fold in the Whipped Cream: Gently fold the whipped cream into the cream cheese mixture until fully combined. Be careful not to deflate the whipped cream; this step is crucial for a light cheesecake.
Step 3: Assemble the Cups
- Layer the Filling: Spoon the cheesecake filling over the prepared crust in each cup, filling them to the top.
- Chill: Cover the cups with plastic wrap and refrigerate for at least 70 minutes, allowing the cheesecake to set properly.
Step 4: Serve and Enjoy
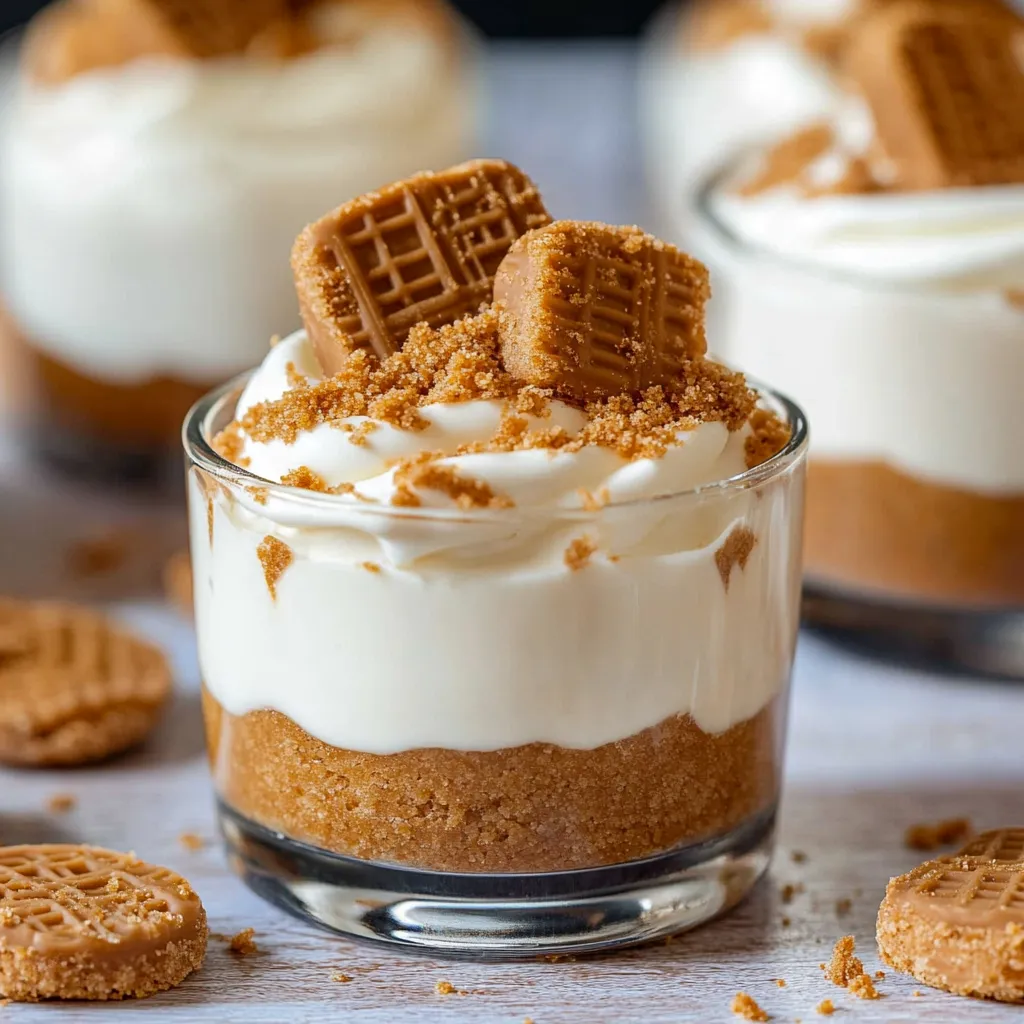
- Garnish: Before serving, top each cheesecake cup with a Biscoff cookie and optional chocolate shavings or whipped cream for an extra touch of decadence.
- Savor the Flavor: Dig in and enjoy your delicious, creamy, and indulgent No-Bake Biscoff Cheesecake Cups!
Nutritional Information
Understanding the nutritional content of your dessert is important, especially if you’re mindful of your dietary intake. Here’s a breakdown of the approximate nutritional values per serving (based on 6 servings):
- Calories: 320
- Total Fat: 23g
- Saturated Fat: 14g
- Cholesterol: 70mg
- Sodium: 180mg
- Total Carbohydrates: 30g
- Dietary Fiber: 1g
- Sugars: 18g
- Protein: 3g
Note: Nutritional values may vary based on specific brands and ingredient substitutions.
Healthier Alternatives for the Recipe
If you’re looking to make your No-Bake Biscoff Cheesecake Cups a bit healthier, consider these alternatives:
- Lower Fat Cream Cheese: Use reduced-fat cream cheese to cut down on calories and fat.
- Coconut Cream: For a dairy-free option, substitute cream cheese with coconut cream and use a dairy-free whipped topping.
- Natural Sweeteners: Replace powdered sugar with natural sweeteners like honey or maple syrup to reduce refined sugar intake.
These modifications can help you enjoy this delicious dessert while adhering to various dietary preferences and restrictions.
Serving Suggestions
To elevate your No-Bake Biscoff Cheesecake Cups, consider the following serving suggestions:
- Pair with Fresh Fruit: Serve alongside fresh berries or sliced bananas for a refreshing contrast to the rich cheesecake.
- Create a Dessert Platter: Arrange the cups on a platter with an assortment of cookies, chocolates, and fruits for a stunning dessert table.
- Make it a Party Favor: Package individual cups in mason jars with lids for a delightful take-home treat for guests at your next celebration.
Common Mistakes to Avoid
When making your No-Bake Biscoff Cheesecake Cups, keep these common pitfalls in mind:
- Not Softening the Cream Cheese: Ensure your cream cheese is at room temperature for a smooth filling. Cold cream cheese can lead to lumps in your mixture.
- Overmixing the Whipped Cream: Gently fold the whipped cream into the cream cheese mixture to maintain that light, airy texture.
- Skipping the Chilling Time: Allowing the cheesecake to set in the refrigerator is crucial for achieving the perfect consistency. Don’t rush this step!
Storing Tips for the Recipe
If you have leftovers or want to prepare in advance, here are some storing tips:
- Refrigeration: Store the cheesecake cups in an airtight container in the refrigerator for up to 3 days.
- Freezing: You can freeze the cheesecake cups for up to 1 month. Just be sure to cover them well to prevent freezer burn. Thaw in the refrigerator before serving.
Conclusion
In summary, these No-Bake Biscoff Cheesecake Cups are a delightful, quick, and easy dessert that combines the rich flavors of Biscoff cookies with a creamy cheesecake filling. Perfect for any occasion, they’re sure to impress! Give this recipe a try, share your feedback in the comments, and subscribe for more delicious updates!
FAQs
Can I use other types of cookies for the crust?
Absolutely! While Biscoff cookies provide a unique flavor, you can substitute them with graham crackers, Oreos, or any cookie of your choice.
How long can I store these cheesecake cups?
These cheesecake cups can be stored in the refrigerator for up to 3 days. If you freeze them, they can last for about a month.
Can I make this recipe vegan?
Yes! Substitute the cream cheese with a vegan cream cheese alternative and use coconut cream for the whipped topping. Ensure the cookies are also vegan-friendly.
What if I don’t have heavy cream?
If you don’t have heavy cream, you can use a combination of milk and butter (3/4 cup milk with 1/4 cup melted butter) as a substitute, though the texture may differ slightly.
Can I make this recipe in advance?
Definitely! These cheesecake cups can be made a day ahead of time, making them a great option for parties or gatherings. Just remember to keep them refrigerated until serving.

No-Bake Biscoff Cheesecake Cups
Ingredients
- For the Cheesecake Filling:
- 8 oz (225g) cream cheese, softened
- 1 cup (240ml) heavy whipping cream
- 1/2 cup (60g) powdered sugar
- 1/2 cup (120g) Biscoff spread
- 1 tsp vanilla extract
- For the Biscoff Crust:
- 1 cup (120g) Biscoff cookies, crushed
- 4 tbsp (60g) unsalted butter, melted
- For Topping:
- Additional Biscoff cookies for garnish
- Optional: chocolate shavings or whipped cream for extra flair
- Substitutions:
- Use Greek yogurt instead of cream cheese for a lighter option.
- Swap out Biscoff spread for Nutella or any other cookie butter for a different flavor profile.
Instructions
- Crush the Cookies: In a food processor, pulse the Biscoff cookies until finely crushed. You can also place them in a zip-top bag and crush them with a rolling pin if you prefer a more hands-on approach.
- Mix with Butter: In a medium bowl, combine the crushed cookies with melted butter. Stir until the mixture resembles wet sand.
- Form the Base: Divide the crust mixture evenly among serving cups or jars, pressing it down firmly to create a solid base. Set aside while you prepare the filling.
- Whip the Cream: In a large mixing bowl, whip the heavy cream until stiff peaks form. This will give your cheesecake a light and airy texture.
- Combine Ingredients: In another bowl, beat the softened cream cheese, powdered sugar, Biscoff spread, and vanilla extract until smooth and creamy.
- Fold in the Whipped Cream: Gently fold the whipped cream into the cream cheese mixture until fully combined. Be careful not to deflate the whipped cream; this step is crucial for a light cheesecake.
- Layer the Filling: Spoon the cheesecake filling over the prepared crust in each cup, filling them to the top.
- Chill: Cover the cups with plastic wrap and refrigerate for at least 70 minutes, allowing the cheesecake to set properly.
- Garnish: Before serving, top each cheesecake cup with a Biscoff cookie and optional chocolate shavings or whipped cream for an extra touch of decadence.
- Savor the Flavor: Dig in and enjoy your delicious, creamy, and indulgent No-Bake Biscoff Cheesecake Cups!