
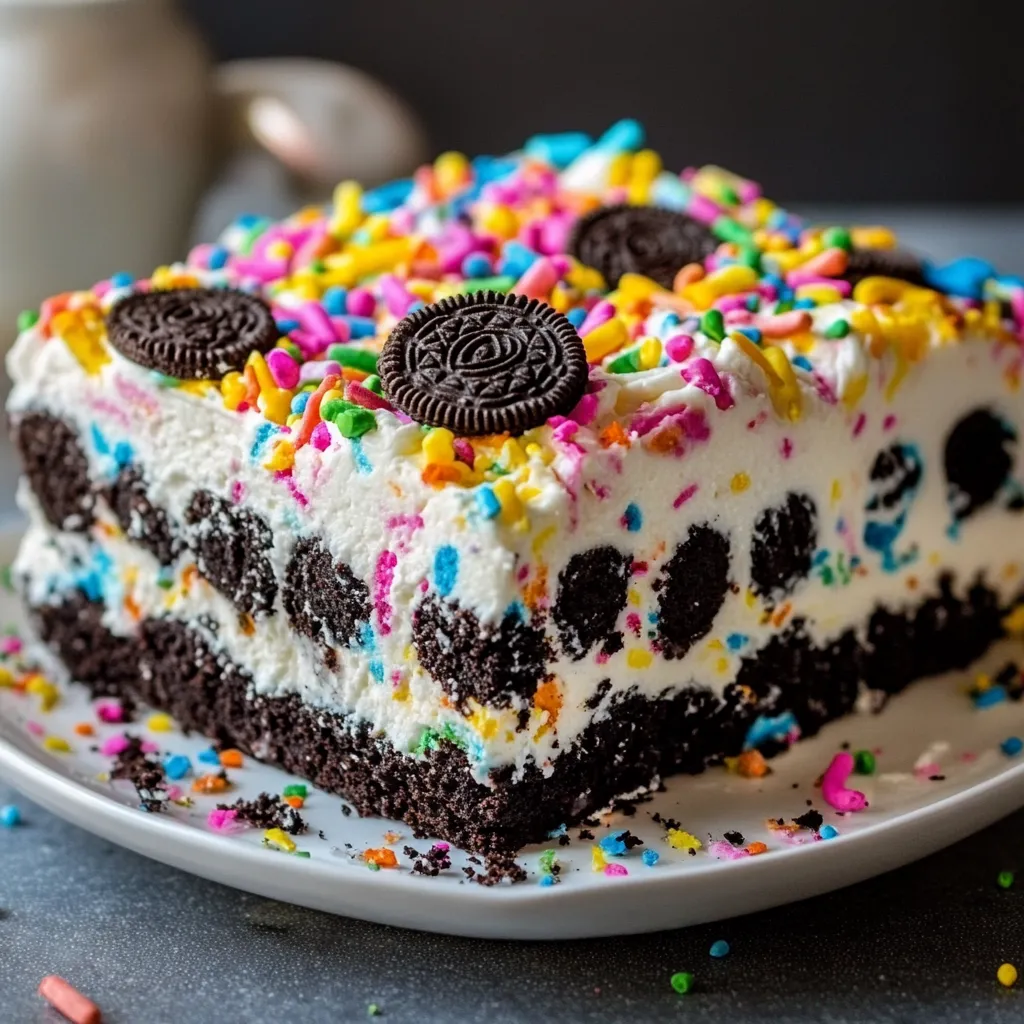
No Bake Funfetti Oreo Icebox Cake
Introduction
Are you looking for a dessert that is not only easy to make but also a guaranteed crowd-pleaser? What if I told you that you could create a delicious No Bake Funfetti Oreo Icebox Cake in just 90 minutes? This delightful treat combines the nostalgia of childhood birthday parties with the creamy goodness of Oreos, making it the perfect indulgence for any occasion. The best part? You don’t need an oven! In this blog post, we’ll walk you through the steps to create this scrumptious dessert while exploring tips and tricks to make it your own. Let’s dive into the world of no-bake desserts and discover how easy it is to whip up this Funfetti Oreo Icebox Cake!
Ingredients List
To create your No Bake Funfetti Oreo Icebox Cake, you will need the following ingredients:
Essential Ingredients
- Oreo Cookies: 24 whole cookies plus extra for garnish. These will form the base and layers of your cake.
- Cream Cheese: 8 oz, softened. This adds a rich, creamy texture.
- Whipped Topping: 2 cups, thawed. For that light and fluffy feel.
- Powdered Sugar: 1 cup. This sweetens the mixture perfectly.
- Funfetti Cake Mix: 1 cup (dry). This gives the cake its colorful, festive flair.
- Milk: 1 cup. Helps to soften the cookies and blend the flavors.
Optional Substitutions
- Gluten-Free Oreos: For a gluten-free version, use gluten-free Oreos.
- Greek Yogurt: Substitute for cream cheese for a lighter option.
- Coconut Whipped Cream: Use instead of traditional whipped topping for a dairy-free alternative.
Sensory Descriptions
Imagine the rich chocolate flavor of the Oreos, the creamy texture of the filling, and the bursts of color from the Funfetti cake mix. Each bite is a delightful combination of flavors and textures that will transport you back to your favorite childhood memories.
Timing
Creating your No Bake Funfetti Oreo Icebox Cake is quick and simple. Here’s a breakdown of the timing involved:
- Preparation Time: 20 minutes
- Chilling Time: 1 hour
- Total Time: 1 hour 20 minutes
This means you can have a delicious dessert ready in about 20% less time than the average no-bake cake recipe!
Step-by-Step Instructions
Step 1: Prepare the Oreo Crust
- Crush the Oreos: In a food processor, pulse 24 Oreo cookies until they are fine crumbs. If you don’t have a food processor, place the cookies in a zip-top bag and crush them with a rolling pin.
- Mix with Butter: In a bowl, combine the crushed Oreos with 4 tablespoons of melted butter. Stir until the mixture resembles wet sand.
- Form the Crust: Press the Oreo mixture into the bottom of a 9×9-inch square baking dish to form an even layer. Set aside.
Step 2: Make the Creamy Filling
- Blend Cream Cheese: In a mixing bowl, beat the softened cream cheese until smooth and creamy.
- Add Sugar and Cake Mix: Gradually add the powdered sugar and Funfetti cake mix to the cream cheese, mixing until well combined.
- Fold in Whipped Topping: Gently fold in the whipped topping until the mixture is light and fluffy. Be careful not to deflate the whipped cream.
Step 3: Assemble the Cake
- Layer the Filling: Spread half of the cream filling over the prepared Oreo crust.
- Add Another Layer of Cookies: Dip the remaining Oreo cookies in milk briefly and layer them over the cream filling.
- Top with Remaining Filling: Spread the remaining cream filling on top of the cookies, smoothing it out with a spatula.
Step 4: Chill and Serve
- Chill: Cover the dish with plastic wrap and refrigerate for at least one hour to allow the flavors to meld and the cake to set.
- Garnish: Before serving, crush a few extra Oreos and sprinkle them on top for added texture and visual appeal.
Nutritional Information
Here’s a breakdown of the nutritional information per serving (assuming 9 servings):
- Calories: 320
- Total Fat: 18g
- Saturated Fat: 9g
- Cholesterol: 30mg
- Sodium: 200mg
- Total Carbohydrates: 37g
- Dietary Fiber: 1g
- Sugars: 18g
- Protein: 3g
This dessert is a delightful treat that balances indulgence with enjoyment!
Healthier Alternatives for the Recipe
If you’re looking to make your No Bake Funfetti Oreo Icebox Cake a bit healthier, consider these modifications:
- Use Low-Fat Cream Cheese: This will reduce the overall fat content while still maintaining creaminess.
- Reduce Sugar: Cut the powdered sugar by half or use a sugar substitute like stevia or monk fruit sweetener.
- Add Fresh Fruit: Layer in some fresh berries or bananas for added nutrition and flavor.
Serving Suggestions
To make your No Bake Funfetti Oreo Icebox Cake even more enjoyable, consider these creative serving suggestions:
- Serve with Fresh Berries: A side of strawberries or raspberries adds a fresh contrast to the creamy cake.
- Drizzle with Chocolate Sauce: A drizzle of chocolate sauce on top elevates the dessert to a new level of indulgence.
- Ice Cream Pairing: Serve slices with a scoop of vanilla or cookies and cream ice cream for a decadent treat.
Common Mistakes to Avoid
To ensure your No Bake Funfetti Oreo Icebox Cake turns out perfectly, here are some common pitfalls to avoid:
- Overmixing the Cream Filling: This can deflate the whipped topping and result in a denser texture.
- Not Chilling Long Enough: Skipping the chilling time can lead to a runny cake. Patience is key!
- Using Warm Ingredients: Ensure your cream cheese is softened but not warm, as it can affect the consistency of the filling.
Storing Tips for the Recipe
To keep your No Bake Funfetti Oreo Icebox Cake fresh, follow these storage tips:
- Refrigeration: Store leftovers in an airtight container in the refrigerator for up to 3 days.
- Freezing: For longer storage, you can freeze the cake for up to a month. Just be sure to wrap it tightly in plastic wrap and foil to prevent freezer burn.
- Thawing: When ready to enjoy, thaw in the refrigerator overnight before serving.
Conclusion
In summary, the No Bake Funfetti Oreo Icebox Cake is a delightful, easy-to-make dessert that combines the fun of Oreos with the festive spirit of Funfetti. With just a few simple steps, you can create a treat that’s perfect for any occasion. Don’t hesitate to try this recipe, and be sure to share your feedback in the comments section below! Subscribe for more delicious recipes and updates!
FAQs
Can I use other types of cookies?
Absolutely! Feel free to experiment with different cookies like chocolate chip or vanilla wafers for a unique twist.
How long does this cake last?
When stored properly, the cake can last up to 3 days in the refrigerator or up to a month in the freezer.
Can I make this cake ahead of time?
Yes! This cake is perfect for making ahead of time. Just be sure to allow enough chilling time before serving.
Is this recipe suitable for kids?
Definitely! This no-bake recipe is fun to make and eat, making it a great project for kids with adult supervision.
What can I use instead of whipped topping?
You can use homemade whipped cream or coconut whipped cream as a substitute for a more natural option.

No Bake Funfetti Oreo Icebox Cake
Ingredients
- Oreo Cookies: 24 whole cookies plus extra for garnish. These will form the base and layers of your cake.
- Cream Cheese: 8 oz, softened. This adds a rich, creamy texture.
- Whipped Topping: 2 cups, thawed. For that light and fluffy feel.
- Powdered Sugar: 1 cup. This sweetens the mixture perfectly.
- Funfetti Cake Mix: 1 cup (dry). This gives the cake its colorful, festive flair.
- Milk: 1 cup. Helps to soften the cookies and blend the flavors.
- Optional Substitutions
- Gluten-Free Oreos: For a gluten-free version, use gluten-free Oreos.
- Greek Yogurt: Substitute for cream cheese for a lighter option.
- Coconut Whipped Cream: Use instead of traditional whipped topping for a dairy-free alternative.
Instructions
- Crush the Oreos: In a food processor, pulse 24 Oreo cookies until they are fine crumbs. If you don’t have a food processor, place the cookies in a zip-top bag and crush them with a rolling pin.
- Mix with Butter: In a bowl, combine the crushed Oreos with 4 tablespoons of melted butter. Stir until the mixture resembles wet sand.
- Form the Crust: Press the Oreo mixture into the bottom of a 9x9-inch square baking dish to form an even layer. Set aside.
- Blend Cream Cheese: In a mixing bowl, beat the softened cream cheese until smooth and creamy.
- Add Sugar and Cake Mix: Gradually add the powdered sugar and Funfetti cake mix to the cream cheese, mixing until well combined.
- Fold in Whipped Topping: Gently fold in the whipped topping until the mixture is light and fluffy. Be careful not to deflate the whipped cream.
- Layer the Filling: Spread half of the cream filling over the prepared Oreo crust.
- Add Another Layer of Cookies: Dip the remaining Oreo cookies in milk briefly and layer them over the cream filling.
- Top with Remaining Filling: Spread the remaining cream filling on top of the cookies, smoothing it out with a spatula.
- Chill: Cover the dish with plastic wrap and refrigerate for at least one hour to allow the flavors to meld and the cake to set.
- Garnish: Before serving, crush a few extra Oreos and sprinkle them on top for added texture and visual appeal.