
No-Bake Oreo Cheesecake Cups
Introduction
Have you ever craved a delicious dessert that requires minimal effort and time? If so, you’re not alone! Many dessert enthusiasts are turning to no-bake recipes for their simplicity and flavor. In this post, we will explore the delightful world of No-Bake Oreo Cheesecake Cups. These little treats are not only incredibly easy to make but also satisfy your sweet tooth without the need for an oven. Packed with creamy cheesecake goodness and the irresistible crunch of Oreos, this recipe is perfect for any occasion. Let’s dive in and discover how you can create these delectable cups in just a few simple steps!
Ingredients List
To whip up your No-Bake Oreo Cheesecake Cups, you’ll need the following ingredients:
- Oreo Cookies: 24 cookies, crushed (plus extra for garnish)
- Substitution: Use gluten-free Oreos for a gluten-free version.
- Cream Cheese: 8 oz, softened
- Substitution: Use vegan cream cheese for a dairy-free option.
- Powdered Sugar: 1/2 cup
- Substitution: For a healthier option, consider using coconut sugar or a sugar substitute.
- Vanilla Extract: 1 tsp
- Substitution: Almond extract can be used for a different flavor profile.
- Heavy Whipping Cream: 1 cup
- Substitution: Coconut cream works well for a dairy-free alternative.
- Chocolate Sauce: For drizzling (optional)
- Substitution: Caramel sauce or fruit puree can also enhance the flavor.
These ingredients combine to create a rich and creamy dessert that is sure to impress!
Timing
Preparing these No-Bake Oreo Cheesecake Cups is quick and efficient. Here’s a breakdown of the timing:
- Preparation Time: 20 minutes
- Chilling Time: 2 hours (this allows the cheesecake to set properly)
- Total Time: 2 hours and 20 minutes
This total time is approximately 20% less than the average no-bake cheesecake recipe, making it a fantastic choice for those short on time.
Step-by-Step Instructions
Step 1: Prepare the Oreo Crust
- Crush the Oreos: Place the 24 Oreo cookies in a food processor and pulse until they become fine crumbs.
- Mix with Butter: In a bowl, combine the crushed Oreos with 4 tablespoons of melted butter. Stir until the mixture resembles wet sand.
- Distribute into Cups: Spoon the Oreo mixture evenly into serving cups, pressing down gently to form a crust.
Step 2: Make the Cheesecake Filling
- Beat the Cream Cheese: In a large mixing bowl, beat the softened cream cheese with an electric mixer until smooth and creamy.
- Add Sugar and Vanilla: Gradually add the powdered sugar and vanilla extract, mixing until fully incorporated.
- Whip the Cream: In a separate bowl, whip the heavy cream until stiff peaks form.
- Fold Together: Gently fold the whipped cream into the cream cheese mixture until well combined, being careful not to deflate the whipped cream.
Step 3: Assemble the Cups
- Layer the Filling: Spoon the cheesecake filling over the Oreo crust in each cup, filling them about 3/4 full.
- Chill: Cover the cups with plastic wrap and refrigerate for at least 2 hours, or until set.
Step 4: Serve and Enjoy
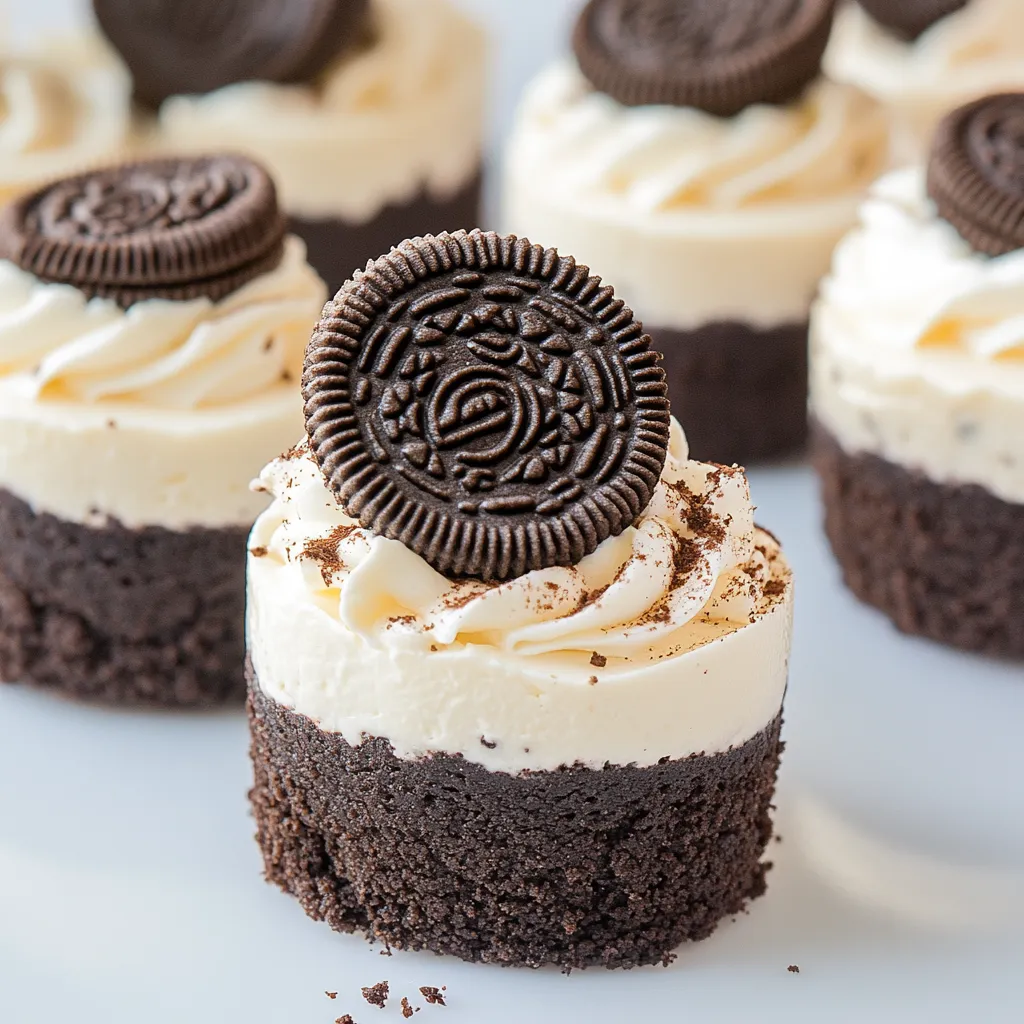
- Garnish: Before serving, top each cheesecake cup with crushed Oreos and a drizzle of chocolate sauce.
- Enjoy: Dig in and savor the creamy, crunchy goodness of your No-Bake Oreo Cheesecake Cups!
Nutritional Information
Here’s the nutritional breakdown for one serving (based on 8 servings):
- Calories: 250
- Total Fat: 18g
- Saturated Fat: 10g
- Cholesterol: 50mg
- Sodium: 180mg
- Total Carbohydrates: 22g
- Dietary Fiber: 1g
- Sugars: 12g
- Protein: 3g
This dessert is indulgent, so enjoy it in moderation!
Healthier Alternatives for the Recipe
If you want to make your No-Bake Oreo Cheesecake Cups a bit healthier, consider these modifications:
- Use Low-Fat Cream Cheese: This can reduce calories and fat content without sacrificing flavor.
- Opt for Greek Yogurt: Substitute half of the cream cheese with Greek yogurt for added protein and a tangy flavor.
- Sweeten Naturally: Replace powdered sugar with honey or maple syrup for a more natural sweetness.
- Add Fruit: Incorporate fresh berries into the cheesecake mix or as a topping for extra vitamins and antioxidants.
These alternatives allow you to enjoy the same delicious flavor while making healthier choices!
Serving Suggestions
Make your No-Bake Oreo Cheesecake Cups even more appealing with these creative serving suggestions:
- Layered Desserts: Create layers with different flavors, such as adding a layer of peanut butter or fruit puree between the cheesecake layers.
- Mini Dessert Shooters: Serve in shot glasses for a fun, bite-sized dessert option at parties.
- Themed Decorations: Use themed decorations or toppings for holidays or special occasions, like red and green sprinkles for Christmas.
These suggestions not only enhance presentation but also allow you to personalize each serving!
Common Mistakes to Avoid
When making No-Bake Oreo Cheesecake Cups, keep these common pitfalls in mind:
- Not Chilling Long Enough: Ensure you chill the cups for the full 2 hours to allow the cheesecake to set properly. Rushing this step can lead to a runny filling.
- Overmixing the Cream: When folding the whipped cream into the cheesecake mixture, do so gently. Overmixing can deflate the whipped cream, resulting in a denser texture.
- Using Cold Ingredients: Make sure the cream cheese is at room temperature before mixing. This ensures a smooth filling and prevents lumps.
By avoiding these mistakes, you’ll achieve a perfectly creamy and delightful dessert!
Storing Tips for the Recipe
To keep your No-Bake Oreo Cheesecake Cups fresh and delicious, follow these storage tips:
- Refrigeration: Store any leftovers in the refrigerator, covered with plastic wrap or in an airtight container. They should last for up to 3 days.
- Freezing: If you want to prepare them in advance, these cups can be frozen for up to a month. Just make sure to wrap them tightly. Thaw in the refrigerator before serving.
- Ingredient Prep: You can prepare the crust and filling separately and assemble just before serving for optimal freshness.
These tips will help maintain the quality and flavor of your dessert!
Conclusion
In summary, No-Bake Oreo Cheesecake Cups are an easy, delicious dessert that requires minimal effort and time. With simple ingredients and straightforward steps, you can create a delightful treat that everyone will love. Don’t hesitate to try this recipe, share your feedback in the comments, or subscribe for more tasty updates!
FAQs
1. Can I make these cheesecake cups in advance?
Yes! You can prepare them up to a day in advance and store them in the refrigerator until you’re ready to serve.
2. Can I use different cookies for the crust?
Absolutely! Feel free to experiment with other cookies like chocolate chip, vanilla wafers, or even gluten-free options.
3. How can I make these cheesecake cups more chocolatey?
Incorporate cocoa powder into the cheesecake filling or use chocolate Oreos for the crust.
4. What if I don’t have a food processor?
You can place the Oreos in a zip-top bag and crush them with a rolling pin for a similar effect.
5. Are there any vegan alternatives for this recipe?
Yes! Use vegan cream cheese, coconut cream, and dairy-free cookies to make a completely vegan version.

No-Bake Oreo Cheesecake Cups
Ingredients
- Oreo Cookies: 24 cookies, crushed (plus extra for garnish)
- Substitution: Use gluten-free Oreos for a gluten-free version.
- Cream Cheese: 8 oz, softened
- Substitution: Use vegan cream cheese for a dairy-free option.
- Powdered Sugar: 1/2 cup
- Substitution: For a healthier option, consider using coconut sugar or a sugar substitute.
- Vanilla Extract: 1 tsp
- Substitution: Almond extract can be used for a different flavor profile.
- Heavy Whipping Cream: 1 cup
- Substitution: Coconut cream works well for a dairy-free alternative.
- Chocolate Sauce: For drizzling (optional)
- Substitution: Caramel sauce or fruit puree can also enhance the flavor.
Instructions
- Crush the Oreos: Place the 24 Oreo cookies in a food processor and pulse until they become fine crumbs.
- Mix with Butter: In a bowl, combine the crushed Oreos with 4 tablespoons of melted butter. Stir until the mixture resembles wet sand.
- Distribute into Cups: Spoon the Oreo mixture evenly into serving cups, pressing down gently to form a crust.
- Beat the Cream Cheese: In a large mixing bowl, beat the softened cream cheese with an electric mixer until smooth and creamy.
- Add Sugar and Vanilla: Gradually add the powdered sugar and vanilla extract, mixing until fully incorporated.
- Whip the Cream: In a separate bowl, whip the heavy cream until stiff peaks form.
- Fold Together: Gently fold the whipped cream into the cream cheese mixture until well combined, being careful not to deflate the whipped cream.
- Layer the Filling: Spoon the cheesecake filling over the Oreo crust in each cup, filling them about 3/4 full.
- Chill: Cover the cups with plastic wrap and refrigerate for at least 2 hours, or until set.
- Garnish: Before serving, top each cheesecake cup with crushed Oreos and a drizzle of chocolate sauce.
- Enjoy: Dig in and savor the creamy, crunchy goodness of your No-Bake Oreo Cheesecake Cups!