
No-Bake Oreo Cheesecake: The Ultimate Dessert Delight
Introduction
Have you ever craved a dessert that combines the rich, creamy goodness of cheesecake with the delightful crunch of Oreos, all without the hassle of baking? If so, you’re in for a treat! This No-Bake Oreo Cheesecake is not only delicious but also incredibly easy to make, taking just a fraction of the time compared to traditional cheesecakes. In fact, did you know that no-bake cheesecakes can save you up to 30% of the time spent in the kitchen? Let’s dive into this delectable recipe that will surely impress your friends and family!
Ingredients List
To create this mouthwatering No-Bake Oreo Cheesecake, you’ll need the following ingredients. Feel free to get creative with substitutions based on your preferences:
For the Crust:
- 24 Oreo cookies (crushed)
- 1/2 cup unsalted butter (melted)
- 1 tablespoon sugar (optional, for added sweetness)
For the Filling:
- 16 oz cream cheese (softened)
- 1 cup powdered sugar
- 1 teaspoon vanilla extract
- 2 cups heavy whipping cream (chilled)
- 8 Oreo cookies (roughly chopped, for mixing in)
For Garnish:
- Whipped cream (for topping)
- Crushed Oreos (for sprinkling on top)
- Chocolate syrup (optional, for drizzling)
Substitution Suggestions:
- Gluten-free Oreos can be used for a gluten-free version.
- Low-fat cream cheese can be swapped for a lighter option.
- Coconut cream can replace heavy whipping cream for a dairy-free version.
Timing
This No-Bake Oreo Cheesecake can be prepared in just 30 minutes, with an additional 4 hours of chilling time in the refrigerator. In total, you’re looking at about 4 hours and 30 minutes, which is 20% less time than many traditional cheesecake recipes that require baking and cooling time.
Step-by-Step Instructions
Step 1: Prepare the Crust
- Crush the Oreos: In a food processor, pulse the 24 Oreo cookies until they form fine crumbs. This step releases the delicious chocolate flavor, making for a rich crust.
- Mix with Butter: In a medium bowl, combine the crushed Oreos with melted butter and sugar (if using). Stir until the mixture resembles wet sand.
- Form the Crust: Press the Oreo mixture firmly into the bottom of a 9-inch springform pan, ensuring an even layer. Use the back of a measuring cup to pack it tightly.

Step 2: Make the Filling
- Beat the Cream Cheese: In a large mixing bowl, beat the softened cream cheese until smooth and creamy, about 2-3 minutes. This creates a light and fluffy texture for your cheesecake.
- Add Sugar and Vanilla: Gradually add the powdered sugar and vanilla extract, mixing until fully incorporated.
- Whip the Cream: In a separate bowl, whip the chilled heavy cream until stiff peaks form. This will add lightness to your cheesecake filling.
- Combine: Gently fold the whipped cream into the cream cheese mixture until no streaks remain. Be careful not to deflate the whipped cream.
- Add Chopped Oreos: Fold in the 8 roughly chopped Oreos for added texture and flavor.
Step 3: Assemble the Cheesecake
- Pour the Filling: Spoon the cheesecake filling over the prepared crust, spreading it evenly with a spatula.
- Smooth the Top: Use the spatula to smooth the top of the cheesecake, creating a beautiful surface for garnishing.
Step 4: Chill
- Refrigerate: Cover the cheesecake with plastic wrap and refrigerate for at least 4 hours, or overnight for best results. This chilling time allows the cheesecake to set properly.
Step 5: Serve
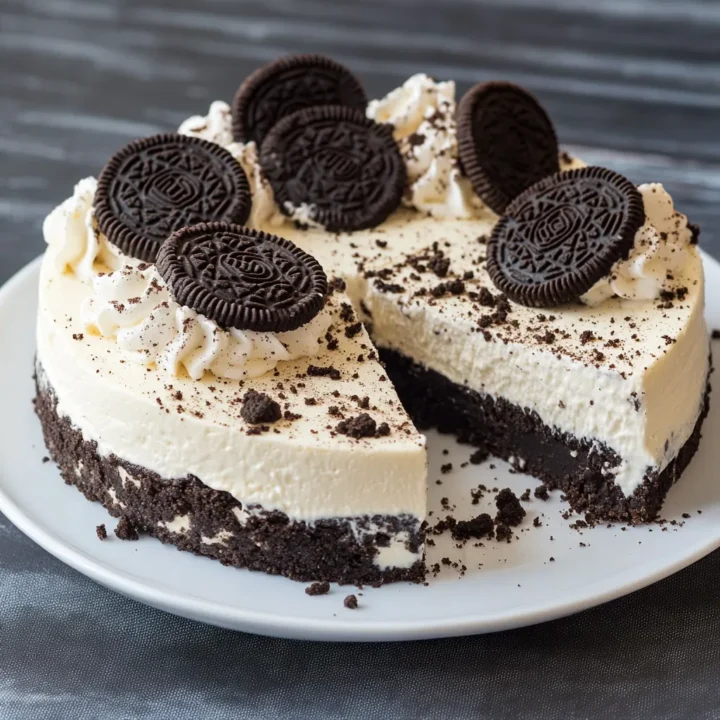
- Garnish: Before serving, top with whipped cream, crushed Oreos, and a drizzle of chocolate syrup if desired.
- Slice and Enjoy: Carefully remove the sides of the springform pan, slice your cheesecake, and serve chilled.
Nutritional Information
Here’s a breakdown of the nutritional information per serving (based on 12 servings):
- Calories: 350
- Total Fat: 25g
- Saturated Fat: 15g
- Cholesterol: 75mg
- Sodium: 150mg
- Total Carbohydrates: 30g
- Dietary Fiber: 1g
- Sugars: 20g
- Protein: 4g
Nutritional Insights
This No-Bake Oreo Cheesecake is a rich dessert that should be enjoyed in moderation. The cream cheese and heavy whipping cream contribute to its creamy texture, while the Oreos provide a delightful crunch.
Healthier Alternatives for the Recipe
If you’re looking to lighten up this No-Bake Oreo Cheesecake without sacrificing flavor, consider these alternatives:
- Use Greek Yogurt: Replace half of the cream cheese with Greek yogurt for a tangy flavor and added protein.
- Opt for Light Cream Cheese: This can significantly reduce calories and fat.
- Sweeten Naturally: Substitute powdered sugar with natural sweeteners like honey or maple syrup for a healthier option.
- Add Fresh Fruit: Incorporate fresh berries or bananas into the filling for added nutrients and natural sweetness.
Serving Suggestions
This No-Bake Oreo Cheesecake is versatile and can be served in various ways:
- Individual Cups: For a fun twist, serve the cheesecake in individual cups layered with crushed Oreos and whipped cream.
- With Fresh Fruit: Pair with fresh berries like strawberries or raspberries for a refreshing contrast to the rich cheesecake.
- Chocolate Shavings: Add chocolate shavings or curls on top for an elegant touch.
- Coffee Pairing: Serve alongside a cup of coffee or espresso for a delightful dessert experience.
Common Mistakes to Avoid
To ensure your No-Bake Oreo Cheesecake turns out perfectly, keep these common pitfalls in mind:
- Not Softening Cream Cheese: Make sure your cream cheese is at room temperature to avoid lumps in the filling.
- Overmixing the Whipped Cream: Whip the cream just until stiff peaks form; overmixing can lead to a grainy texture.
- Skipping Chilling Time: Don’t rush the chilling process! Allowing the cheesecake to set properly is crucial for the best texture.
- Using Warm Ingredients: Ensure all ingredients, especially the cream cheese, are at the right temperature before mixing to achieve a smooth filling.
Storing Tips for the Recipe
To keep your No-Bake Oreo Cheesecake fresh and delicious, follow these storage tips:
- Refrigerate: Store any leftovers in the refrigerator, covered with plastic wrap or in an airtight container. It will stay fresh for up to 5 days.
- Freeze for Longer Storage: If you want to keep it longer, you can freeze slices wrapped in plastic wrap and aluminum foil for up to 3 months. Thaw in the refrigerator before serving.
- Prep Ahead: You can prepare the crust and filling a day in advance and assemble the cheesecake just before serving.
Conclusion
In summary, this No-Bake Oreo Cheesecake is a deliciously easy dessert that combines creamy cheesecake with the irresistible crunch of Oreos. With simple ingredients and straightforward steps, you can create a show-stopping dessert in no time. We invite you to try this recipe, share your feedback in the comments, and subscribe for more delightful recipes!
FAQs
1. Can I use other cookies for the crust?
Absolutely! You can substitute Oreos with any chocolate cookies or even graham crackers for a different flavor profile.
2. How long does the cheesecake need to chill?
For best results, chill the cheesecake for at least 4 hours, but overnight is ideal for a firmer texture.
3. Can I make this cheesecake dairy-free?
Yes, you can use dairy-free cream cheese and coconut cream to create a delicious dairy-free version.
4. What can I do if my cheesecake doesn’t set?
If your cheesecake isn’t setting properly, it may be due to insufficient chilling time. Ensure it’s refrigerated long enough, or consider adding gelatin next time for added firmness.
5. How do I make it more chocolatey?
For an extra chocolate kick, you can add cocoa powder to the filling or use chocolate-flavored Oreos for the crust.
No-Bake Oreo Cheesecake: The Ultimate Dessert Delight
Ingredients
- For the Crust:
- 24 Oreo cookies (crushed)
- 1/2 cup unsalted butter (melted)
- 1 tablespoon sugar (optional, for added sweetness)
- For the Filling:
- 16 oz cream cheese (softened)
- 1 cup powdered sugar
- 1 teaspoon vanilla extract
- 2 cups heavy whipping cream (chilled)
- 8 Oreo cookies (roughly chopped, for mixing in)
- For Garnish:
- Whipped cream (for topping)
- Crushed Oreos (for sprinkling on top)
- Chocolate syrup (optional, for drizzling)
- Substitution Suggestions:
- Gluten-free Oreos can be used for a gluten-free version.
- Low-fat cream cheese can be swapped for a lighter option.
- Coconut cream can replace heavy whipping cream for a dairy-free version.
Instructions
- Crush the Oreos: In a food processor, pulse the 24 Oreo cookies until they form fine crumbs. This step releases the delicious chocolate flavor, making for a rich crust.
- Mix with Butter: In a medium bowl, combine the crushed Oreos with melted butter and sugar (if using). Stir until the mixture resembles wet sand.
- Form the Crust: Press the Oreo mixture firmly into the bottom of a 9-inch springform pan, ensuring an even layer. Use the back of a measuring cup to pack it tightly.
- Beat the Cream Cheese: In a large mixing bowl, beat the softened cream cheese until smooth and creamy, about 2-3 minutes. This creates a light and fluffy texture for your cheesecake.
- Add Sugar and Vanilla: Gradually add the powdered sugar and vanilla extract, mixing until fully incorporated.
- Whip the Cream: In a separate bowl, whip the chilled heavy cream until stiff peaks form. This will add lightness to your cheesecake filling.
- Combine: Gently fold the whipped cream into the cream cheese mixture until no streaks remain. Be careful not to deflate the whipped cream.
- Add Chopped Oreos: Fold in the 8 roughly chopped Oreos for added texture and flavor.
- Pour the Filling: Spoon the cheesecake filling over the prepared crust, spreading it evenly with a spatula.
- Smooth the Top: Use the spatula to smooth the top of the cheesecake, creating a beautiful surface for garnishing.
- Refrigerate: Cover the cheesecake with plastic wrap and refrigerate for at least 4 hours, or overnight for best results. This chilling time allows the cheesecake to set properly.
- Garnish: Before serving, top with whipped cream, crushed Oreos, and a drizzle of chocolate syrup if desired.
- Slice and Enjoy: Carefully remove the sides of the springform pan, slice your cheesecake, and serve chilled.