
Snowball Cake Recipe: A Delightful Dessert for Every Occasion
Introduction
Have you ever wondered what makes a cake truly unforgettable? Is it the rich flavors, the texture, or the way it looks on the table? For many, the answer lies in the Snowball Cake—a dessert that not only tantalizes the taste buds but also brings a visual delight to any gathering. This Snowball Cake recipe promises to be a showstopper at your next celebration, whether it’s a birthday, holiday, or just a treat for yourself. In this post, we’ll explore how to create this delightful cake, packed with flavor and topped with a fluffy frosting that resembles freshly fallen snow.
Ingredients List
To create your Snowball Cake, you’ll need the following ingredients:
Cake Ingredients:
- 2 cups all-purpose flour: This is the foundation of your cake. For a gluten-free option, consider using almond flour or a gluten-free baking mix.
- 1 ½ cups granulated sugar: Sweetness is key. You can substitute coconut sugar for a lower glycemic index option.
- ½ cup unsalted butter, softened: For richness. If you’re dairy-free, use coconut oil or a vegan butter alternative.
- 1 cup whole milk: Adds moisture. Almond milk or oat milk can be great substitutes.
- 3 large eggs: Essential for structure. Flax eggs (1 tablespoon of ground flaxseed mixed with 2.5 tablespoons of water per egg) can work as a vegan substitute.
- 2 ½ teaspoons baking powder: This helps the cake rise.
- 1 teaspoon vanilla extract: For flavor depth. Feel free to experiment with almond extract for a unique twist.
Frosting Ingredients:
- 1 cup heavy cream: For a rich frosting. Use coconut cream for a dairy-free version.
- 2 cups powdered sugar: Sweetens the frosting. You can also use a sugar alternative like erythritol.
- 1 teaspoon vanilla extract: Enhances the flavor.
- Coconut flakes: For decoration and texture. Consider using finely chopped nuts for a different flavor profile.
Timing
Creating your Snowball Cake is a delightful experience that takes about 90 minutes—which is 20% less time than the average cake recipe. Here’s a breakdown of the timing:
- Preparation Time: 30 minutes
- Baking Time: 30 minutes
- Cooling Time: 30 minutes
This efficient timing allows you to whip up this stunning dessert without spending your entire day in the kitchen.
Step-by-Step Instructions
Step 1: Prepare Your Oven and Pans
Preheat your oven to 350°F (175°C). Grease and flour two 9-inch round cake pans. This ensures your cakes will come out easily and maintain their shape.
Step 2: Mix Dry Ingredients
In a large mixing bowl, whisk together the flour, baking powder, and salt. This step is crucial as it evenly distributes the leavening agent, ensuring a uniform rise.
Step 3: Cream Butter and Sugar
In another bowl, beat the butter and sugar together until light and fluffy—about 3-5 minutes. This process incorporates air, leading to a lighter cake.
Step 4: Add Eggs and Milk
Add the eggs one at a time, mixing well after each addition. Then, gradually add the milk and vanilla extract, mixing until just combined.
Step 5: Combine Wet and Dry Ingredients
Slowly add the dry mixture to the wet ingredients, stirring gently until no flour streaks remain. Be careful not to overmix, as this can lead to a dense cake.
Step 6: Bake the Cakes
Pour the batter evenly into the prepared pans. Bake for 30 minutes, or until a toothpick inserted in the center comes out clean. Let them cool in the pans for about 10 minutes before transferring to wire racks.
Step 7: Prepare the Frosting
While the cakes cool, whip the heavy cream until soft peaks form. Gradually add the powdered sugar and vanilla extract, continuing to whip until stiff peaks form.
Step 8: Assemble the Cake
Once the cakes are completely cooled, place one layer on a serving platter. Spread a generous amount of frosting on top, then place the second layer on top. Frost the entire cake with the remaining whipped cream.
Step 9: Decorate
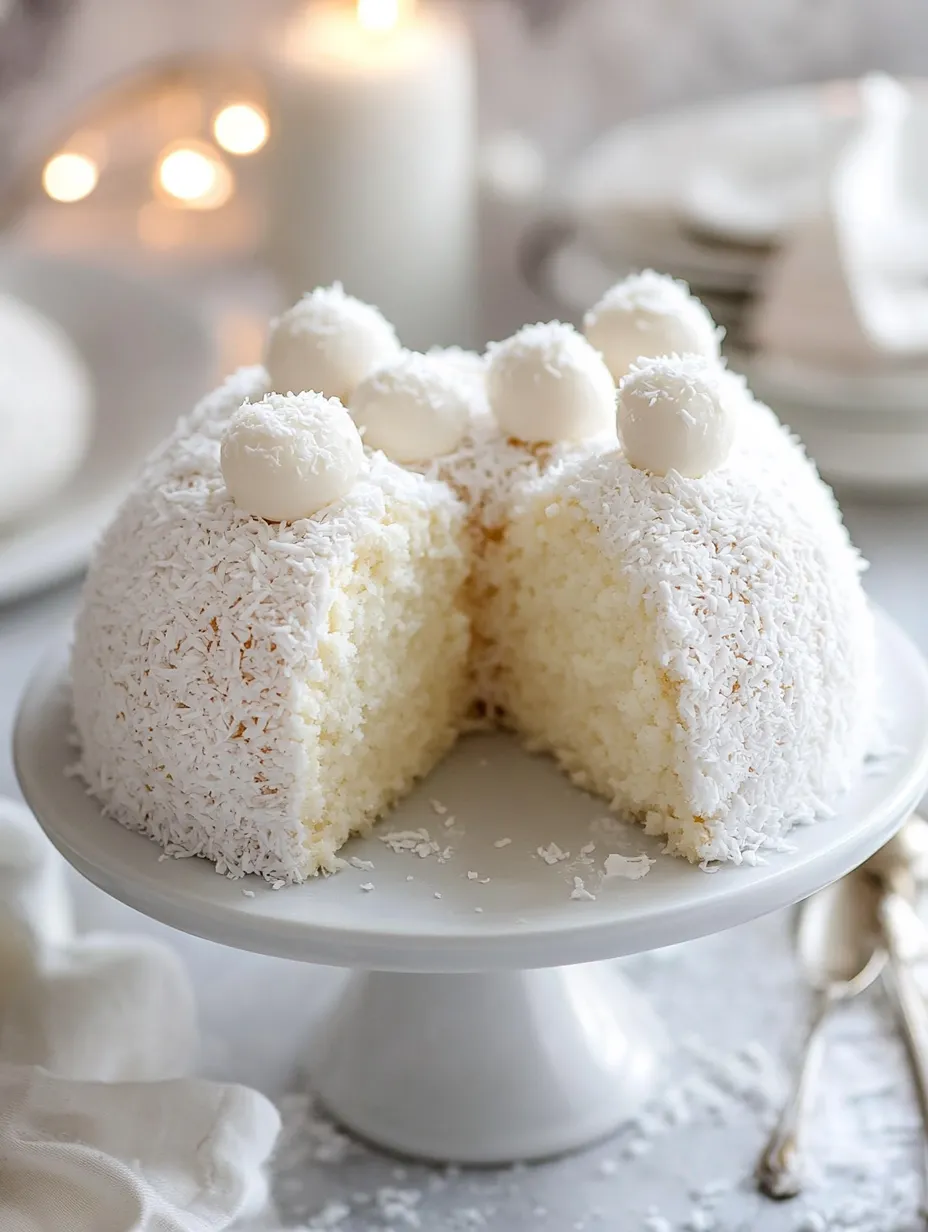
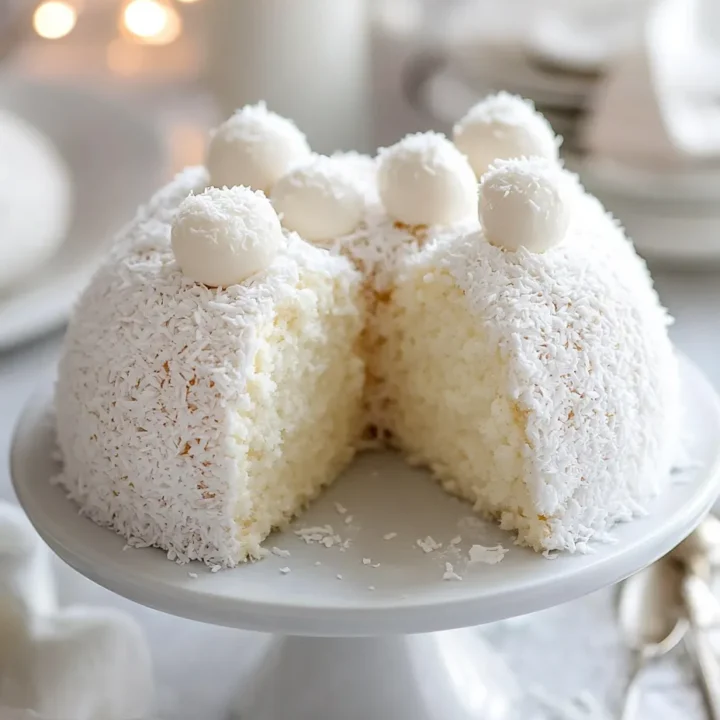
Generously sprinkle coconut flakes over the top and sides of the cake, ensuring it resembles a snowy landscape.
Step 10: Serve and Enjoy
Slice the cake and serve it to your delighted guests. Watch as they marvel at both its appearance and flavor!
Nutritional Information
Here’s a breakdown of the nutritional information per slice (based on 12 slices):
- Calories: 320
- Total Fat: 15g
- Saturated Fat: 9g
- Cholesterol: 70mg
- Sodium: 150mg
- Total Carbohydrates: 45g
- Dietary Fiber: 1g
- Sugars: 25g
- Protein: 4g
This information can vary based on ingredient substitutions, so be mindful of your choices!
Healthier Alternatives for the Recipe
If you’re looking to make your Snowball Cake a bit healthier, consider these alternatives:
- Substitute whole wheat flour for all-purpose flour to increase fiber content.
- Use Greek yogurt instead of some of the butter for a creamier texture with fewer calories.
- Reduce sugar by using ripe bananas or applesauce for natural sweetness.
- Opt for a low-fat whipped topping instead of heavy cream to cut down on calories and fat.
These swaps can help you enjoy a delicious dessert while being mindful of your health.
Serving Suggestions
To make your Snowball Cake even more appealing, consider these serving suggestions:
- Pair with fresh berries: Strawberries, raspberries, or blueberries add a fresh contrast to the sweetness of the cake.
- Drizzle with chocolate sauce: A chocolate ganache or sauce can elevate the dessert and add a rich flavor.
- Serve with a scoop of ice cream: Vanilla, coconut, or even a fruity sorbet can complement the cake beautifully.
- Garnish with mint leaves: Fresh mint adds a pop of color and a refreshing taste.
Common Mistakes to Avoid
Here are some common pitfalls when making a Snowball Cake and how to avoid them:
- Overmixing the batter: This can lead to a tough cake. Mix until just combined.
- Not measuring ingredients accurately: Use measuring cups and spoons for precision.
- Not letting cakes cool completely: Frosting a warm cake can cause the frosting to melt and slide off.
- Skipping the greasing of pans: This can result in a cake that sticks, ruining its shape.
By being mindful of these common mistakes, you’ll ensure your cake turns out perfectly every time.
Storing Tips for the Recipe
To keep your Snowball Cake fresh and delicious, follow these storage tips:
- Refrigerate leftovers: Store in an airtight container in the fridge for up to 3 days.
- Freeze for longer storage: Wrap slices in plastic wrap and aluminum foil, then freeze for up to 3 months. Thaw in the fridge before serving.
- Prep ingredients ahead: You can measure out dry ingredients in advance for quicker assembly on baking day.
Conclusion
The Snowball Cake is not just a dessert; it’s an experience that brings joy to any gathering. With its fluffy texture and delightful frosting, it’s bound to impress your guests. We encourage you to try this recipe, share your feedback in the comments, and subscribe for more delicious updates!
FAQs
Q1: Can I make this cake ahead of time?
Yes, you can bake the cakes a day in advance and store them in the fridge. Frost just before serving for the best texture.
Q2: Is there a vegan version of this recipe?
Absolutely! Substitute eggs with flax eggs, use plant-based butter and milk, and opt for coconut cream for the frosting.
Q3: Can I use a different type of frosting?
Certainly! Cream cheese frosting or a simple glaze can also work beautifully with this cake.
Q4: How can I make this cake more festive?
Consider adding food coloring to the frosting or decorating with seasonal fruits and edible flowers for a vibrant presentation.
Q5: What’s the best way to slice a layered cake?
Use a sharp, serrated knife and wipe it clean between cuts for neat slices.
Snowball Cake Recipe: A Delightful Dessert for Every Occasion
Ingredients
- Cake Ingredients:
- 2 cups all-purpose flour: This is the foundation of your cake. For a gluten-free option, consider using almond flour or a gluten-free baking mix.
- 1 ½ cups granulated sugar: Sweetness is key. You can substitute coconut sugar for a lower glycemic index option.
- ½ cup unsalted butter, softened: For richness. If you're dairy-free, use coconut oil or a vegan butter alternative.
- 1 cup whole milk: Adds moisture. Almond milk or oat milk can be great substitutes.
- 3 large eggs: Essential for structure. Flax eggs (1 tablespoon of ground flaxseed mixed with 2.5 tablespoons of water per egg) can work as a vegan substitute.
- 2 ½ teaspoons baking powder: This helps the cake rise.
- 1 teaspoon vanilla extract: For flavor depth. Feel free to experiment with almond extract for a unique twist.
- Frosting Ingredients:
- 1 cup heavy cream: For a rich frosting. Use coconut cream for a dairy-free version.
- 2 cups powdered sugar: Sweetens the frosting. You can also use a sugar alternative like erythritol.
- 1 teaspoon vanilla extract: Enhances the flavor.
- Coconut flakes: For decoration and texture. Consider using finely chopped nuts for a different flavor profile.
Instructions
Step 1: Prepare Your Oven and Pans
Preheat your oven to 350°F (175°C). Grease and flour two 9-inch round cake pans. This ensures your cakes will come out easily and maintain their shape.
Step 2: Mix Dry Ingredients
In a large mixing bowl, whisk together the flour, baking powder, and salt. This step is crucial as it evenly distributes the leavening agent, ensuring a uniform rise.
Step 3: Cream Butter and Sugar
In another bowl, beat the butter and sugar together until light and fluffy—about 3-5 minutes. This process incorporates air, leading to a lighter cake.
Step 4: Add Eggs and Milk
Add the eggs one at a time, mixing well after each addition. Then, gradually add the milk and vanilla extract, mixing until just combined.
Step 5: Combine Wet and Dry Ingredients
Slowly add the dry mixture to the wet ingredients, stirring gently until no flour streaks remain. Be careful not to overmix, as this can lead to a dense cake.
Step 6: Bake the Cakes
Pour the batter evenly into the prepared pans. Bake for 30 minutes, or until a toothpick inserted in the center comes out clean. Let them cool in the pans for about 10 minutes before transferring to wire racks.
Step 7: Prepare the Frosting
While the cakes cool, whip the heavy cream until soft peaks form. Gradually add the powdered sugar and vanilla extract, continuing to whip until stiff peaks form.
Step 8: Assemble the Cake
Once the cakes are completely cooled, place one layer on a serving platter. Spread a generous amount of frosting on top, then place the second layer on top. Frost the entire cake with the remaining whipped cream.
Step 9: Decorate
Generously sprinkle coconut flakes over the top and sides of the cake, ensuring it resembles a snowy landscape.
Step 10: Serve and Enjoy
Slice the cake and serve it to your delighted guests. Watch as they marvel at both its appearance and flavor!