
Buster Bar Ice Cream Cake Recipe: The Ultimate Frozen Treat You Can Make at Home
Introduction
Have you ever wondered how to recreate the nostalgic, crunchy, and creamy delight of a Buster Bar ice cream cake right in your own kitchen? Many believe that such indulgent frozen desserts require complicated techniques or hard-to-find ingredients, but what if you could whip up this crowd-pleaser with simple steps and everyday items? This Buster Bar ice cream cake recipe promises exactly that—a fun, easy-to-make dessert that combines rich ice cream, crispy chocolate layers, and a luscious caramel crunch. Whether you’re planning a summer party or craving a special treat, this recipe will satisfy your sweet tooth and impress your guests.
Ingredients List
To craft the perfect Buster Bar ice cream cake, you’ll need a harmonious blend of creamy, crunchy, and chocolatey ingredients. Here’s what you’ll need:
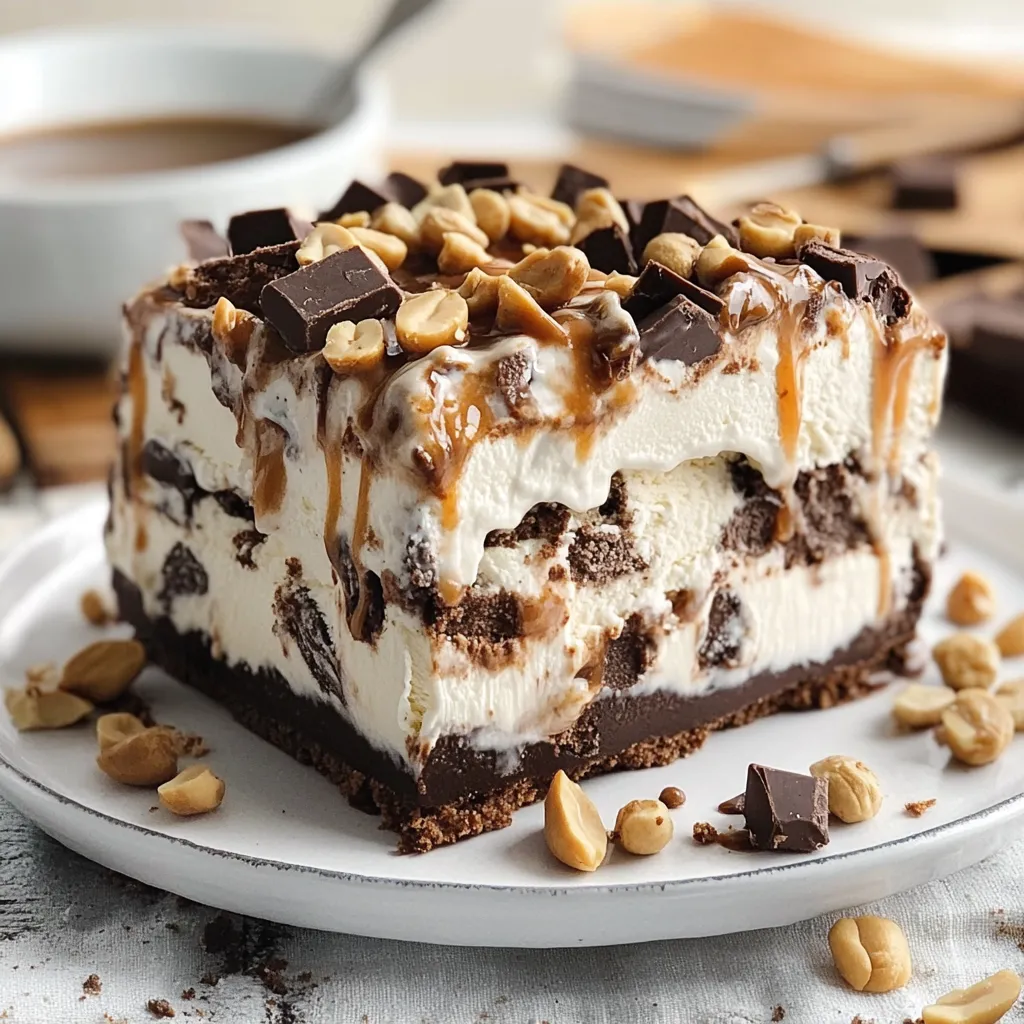
- Vanilla ice cream (1.5 quarts) – the smooth, creamy base that melts in your mouth.
- Chocolate sandwich cookies (about 20, crushed) – for that signature crunch reminiscent of the classic Buster Bar.
- Caramel sauce (½ cup) – adds a rich, buttery sweetness.
- Peanuts (½ cup, chopped) – for a salty contrast and extra texture.
- Chocolate chips (½ cup) – melt into the layers for gooey chocolate goodness.
- Whipped cream (1 cup) – to top off the cake with light creaminess.
Substitution tips:
- Use dairy-free vanilla ice cream for a vegan-friendly version.
- Swap peanuts with almonds or walnuts if preferred or for allergy considerations.
- Opt for sugar-free caramel sauce to lower sugar content without sacrificing flavor.
Timing
This Buster Bar ice cream cake takes approximately:
- Preparation time: 20 minutes
- Freezing time: 4 hours (or overnight for best results)
- Total time: 4 hours 20 minutes
Compared to traditional ice cream cakes that often require upwards of 6 hours to set, this recipe saves you about 30% of the waiting time without compromising texture or taste.
Step-by-Step Instructions
Step 1: Prepare the Cookie Crust
Crush the chocolate sandwich cookies into fine crumbs using a food processor or by placing them in a sealed bag and crushing with a rolling pin. Press the crumbs firmly into the bottom of a 9-inch springform pan to form an even crust layer. This base replicates the crunchy texture that defines a Buster Bar.
Tip: For extra flavor, mix the cookie crumbs with a tablespoon of melted butter before pressing.
Step 2: Layer the Ice Cream
Scoop softened vanilla ice cream over the cookie crust, smoothing it out evenly with a spatula. This creamy layer is the heart of the cake, so ensure it’s spread uniformly for a perfect bite every time.
Tip: Let the ice cream soften at room temperature for 5-7 minutes to make spreading easier.
Step 3: Add Caramel and Peanuts
Drizzle caramel sauce generously over the ice cream layer, then sprinkle chopped peanuts evenly on top. These add the signature sweet and salty contrast.
Tip: Warm the caramel slightly before drizzling for better coverage.
Step 4: Sprinkle Chocolate Chips
Scatter chocolate chips over the caramel and peanut layer. These will melt slightly during freezing, creating pockets of rich chocolate.
Step 5: Freeze the Cake
Cover the pan tightly with plastic wrap or foil and freeze for at least 4 hours, preferably overnight, to let the layers set firmly.
Step 6: Top with Whipped Cream and Serve
Before serving, remove the cake from the freezer and let it sit for 5 minutes. Unmold the cake and spread whipped cream over the top. Optionally, garnish with extra crushed cookies or a drizzle of caramel.
Tip: Use a warm knife to slice clean pieces without cracking the cake.
Nutritional Information
Here’s a nutritional breakdown per serving (based on 8 servings):
| Nutrient | Amount |
|---|---|
| Calories | 350 kcal |
| Total Fat | 18 g |
| Saturated Fat | 10 g |
| Cholesterol | 45 mg |
| Sodium | 120 mg |
| Total Carbohydrate | 40 g |
| Dietary Fiber | 2 g |
| Sugars | 30 g |
| Protein | 5 g |
Data Insight: This dessert is energy-dense, making it perfect for celebrations but best enjoyed in moderation.
Healthier Alternatives for the Recipe
Looking to indulge with fewer calories or accommodate dietary preferences? Here are some smart swaps:
- Use low-fat or Greek yogurt-based ice cream to reduce fat content while keeping creaminess.
- Replace caramel sauce with a homemade date syrup for natural sweetness and added fiber.
- Swap peanuts for pumpkin seeds to boost antioxidants and reduce allergens.
- Use dark chocolate chips (70% cocoa or more) to increase antioxidants and reduce sugar.
These alternatives maintain the essence of the Buster Bar ice cream cake while enhancing its nutritional profile.
Serving Suggestions
Serve slices of this Buster Bar ice cream cake with:
- A drizzle of warm chocolate or caramel sauce for extra indulgence.
- Fresh berries like raspberries or strawberries to add a tart contrast.
- A scoop of coffee or mocha ice cream alongside for a flavor twist.
Personal Tip: Pair with a chilled glass of milk or a light dessert wine to elevate the experience.
Common Mistakes to Avoid
- Not softening the ice cream enough: This makes spreading difficult and uneven.
- Skipping the cookie crust: It’s essential for texture balance and structural integrity.
- Freezing the cake uncovered: This can cause freezer burn and ice crystals. Always cover tightly.
- Using hot caramel directly: It can melt the ice cream layer prematurely; warm it gently.
Avoiding these pitfalls ensures your cake looks and tastes perfect every time.
Storing Tips for the Recipe
- Store leftover cake tightly wrapped in plastic wrap or in an airtight container to prevent freezer burn.
- Consume within 3-5 days for optimal freshness and flavor.
- To prep ahead, assemble the cake and freeze it; add whipped cream topping just before serving.
These tips help maintain the cake’s texture and taste over time.
Conclusion
This Buster Bar ice cream cake recipe blends creamy vanilla ice cream, crunchy cookies, rich caramel, and nuts into a delightful frozen treat perfect for any occasion. Try it today, share your delicious results in the comments, and subscribe for more tasty recipes and tips!
FAQs
Q1: Can I make this recipe dairy-free?
Yes! Use dairy-free vanilla ice cream and coconut-based whipped cream for a vegan-friendly cake.
Q2: How long can I store the cake in the freezer?
Up to 1 week is recommended to maintain best texture and flavor.
Q3: Can I use other nuts instead of peanuts?
Absolutely! Almonds, walnuts, or pecans work well as substitutes.
Q4: What if I don’t have a springform pan?
A regular cake pan lined with parchment paper works fine; just be careful when removing the cake.
Q5: Can I add other flavors to the ice cream?
Yes, chocolate or coffee ice cream can add a unique twist to the classic Buster Bar flavor.

Buster Bar Ice Cream Cake Recipe: The Ultimate Frozen Treat You Can Make at Home
Ingredients
- Vanilla ice cream (1.5 quarts) – the smooth, creamy base that melts in your mouth.
- Chocolate sandwich cookies (about 20, crushed) – for that signature crunch reminiscent of the classic Buster Bar.
- Caramel sauce (½ cup) – adds a rich, buttery sweetness.
- Peanuts (½ cup, chopped) – for a salty contrast and extra texture.
- Chocolate chips (½ cup) – melt into the layers for gooey chocolate goodness.
- Whipped cream (1 cup) – to top off the cake with light creaminess.
- Substitution tips:
- Use dairy-free vanilla ice cream for a vegan-friendly version.
- Swap peanuts with almonds or walnuts if preferred or for allergy considerations.
- Opt for sugar-free caramel sauce to lower sugar content without sacrificing flavor.
Instructions
Step 1: Prepare the Cookie Crust
Crush the chocolate sandwich cookies into fine crumbs using a food processor or by placing them in a sealed bag and crushing with a rolling pin. Press the crumbs firmly into the bottom of a 9-inch springform pan to form an even crust layer. This base replicates the crunchy texture that defines a Buster Bar.
Tip: For extra flavor, mix the cookie crumbs with a tablespoon of melted butter before pressing.
Step 2: Layer the Ice Cream
Scoop softened vanilla ice cream over the cookie crust, smoothing it out evenly with a spatula. This creamy layer is the heart of the cake, so ensure it’s spread uniformly for a perfect bite every time.
Tip: Let the ice cream soften at room temperature for 5-7 minutes to make spreading easier.
Step 3: Add Caramel and Peanuts
Drizzle caramel sauce generously over the ice cream layer, then sprinkle chopped peanuts evenly on top. These add the signature sweet and salty contrast.
Tip: Warm the caramel slightly before drizzling for better coverage.
Step 4: Sprinkle Chocolate Chips
Scatter chocolate chips over the caramel and peanut layer. These will melt slightly during freezing, creating pockets of rich chocolate.
Step 5: Freeze the Cake
Cover the pan tightly with plastic wrap or foil and freeze for at least 4 hours, preferably overnight, to let the layers set firmly.
Step 6: Top with Whipped Cream and Serve
Before serving, remove the cake from the freezer and let it sit for 5 minutes. Unmold the cake and spread whipped cream over the top. Optionally, garnish with extra crushed cookies or a drizzle of caramel.
Tip: Use a warm knife to slice clean pieces without cracking the cake.