
Healthy Homemade Butterfingers Candy Recipe
Introduction
Have you ever wondered how you can enjoy your favorite candy bar without the guilt? What if I told you that you can make a Healthy Homemade Butterfingers Candy Recipe that not only satisfies your sweet tooth but also aligns with your health goals? With rising concerns about sugar and unhealthy ingredients in store-bought candies, creating a healthier version at home is not just a trend—it’s a smart choice! In this post, we will guide you through a delicious, nutritious, and easy-to-follow recipe that will leave you craving more.
Ingredients List
To create your own Healthy Homemade Butterfingers, gather the following ingredients:
- 1 cup natural peanut butter (preferably unsweetened)
- 1/4 cup honey or maple syrup (for a vegan option)
- 1 teaspoon vanilla extract
- 1 cup protein powder (vanilla or chocolate flavor)
- 1/2 cup dark chocolate chips (70% cacao or higher)
- 1 tablespoon coconut oil (for melting chocolate)
- Pinch of sea salt
Substitutions:
- Peanut Butter: You can substitute almond butter or sunflower seed butter for a nut-free option.
- Sweeteners: Agave nectar or brown rice syrup can replace honey or maple syrup.
- Protein Powder: If you prefer a non-protein version, you can use oat flour or ground almonds instead.
Timing
Preparing your Healthy Homemade Butterfingers will take approximately:
- Preparation Time: 15 minutes
- Chilling Time: 30 minutes
- Total Time: 45 minutes
This is significantly quicker than many traditional candy recipes, making it a perfect choice for a quick treat!
Step-by-Step Instructions
Step 1: Prepare the Mixture
In a mixing bowl, combine the peanut butter, honey (or maple syrup), vanilla extract, and a pinch of sea salt. Mix well until smooth and creamy.
Step 2: Incorporate the Protein Powder
Gradually add the protein powder to the peanut butter mixture. Stir until fully incorporated. The mixture should be thick but pliable. If it’s too dry, add a teaspoon of water or more honey.
Step 3: Shape the Bars
Line a baking dish with parchment paper. Transfer the mixture into the dish and press it down evenly, ensuring it’s compact. Aim for about 1/2 inch thickness.
Step 4: Chill
Place the baking dish in the refrigerator for about 30 minutes to allow the mixture to firm up.
Step 5: Melt the Chocolate
While your mixture is chilling, melt the dark chocolate chips with coconut oil in a microwave-safe bowl. Heat in 30-second intervals, stirring in between until smooth.
Step 6: Coat the Bars
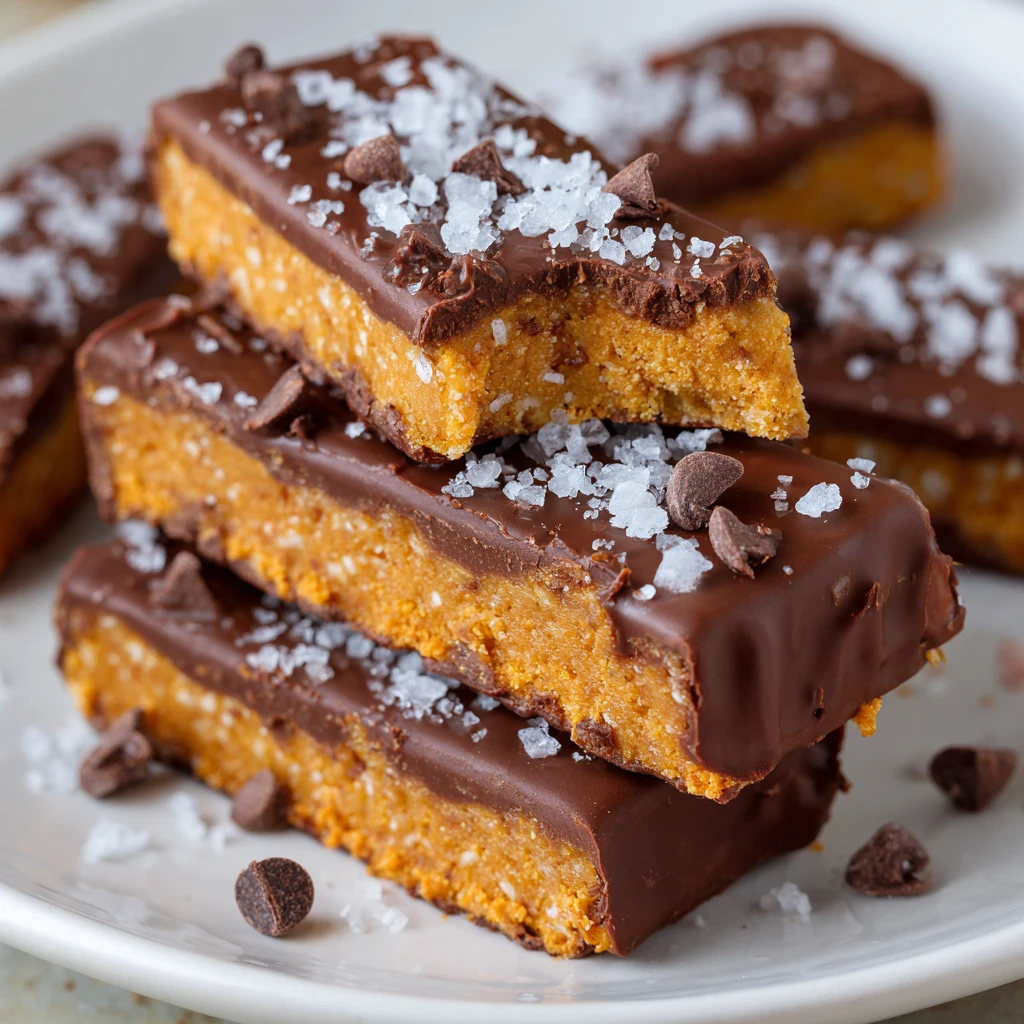
Once the mixture is firm, remove it from the refrigerator and cut it into bars or squares. Dip each piece into the melted chocolate, ensuring it’s fully coated. Place them back on the parchment-lined dish.
Step 7: Final Chill
Return the coated bars to the refrigerator for another 15 minutes until the chocolate is set.
Nutritional Information
Here’s a breakdown of the nutritional information per serving (assuming 10 bars):
- Calories: 150
- Protein: 6g
- Fat: 9g
- Carbohydrates: 12g
- Fiber: 2g
- Sugar: 5g
Nutritional Insights
This recipe is rich in protein and healthy fats, making it a satisfying snack that can help curb cravings while providing essential nutrients.
Healthier Alternatives for the Recipe
To enhance the nutritional profile of your Healthy Homemade Butterfingers, consider these alternatives:
- Use Stevia or Erythritol: For a lower-calorie sweetener option.
- Add Flaxseed or Chia Seeds: Boost the fiber content and omega-3 fatty acids.
- Incorporate Dark Chocolate with Nuts: Add crushed nuts into the chocolate for added texture and nutrients.
Serving Suggestions
These homemade Butterfingers can be enjoyed in various ways:
- On-the-Go Snack: Perfect for a quick energy boost during busy days.
- Dessert Topping: Crumble over yogurt or smoothie bowls for added crunch.
- Gift Idea: Package them in a decorative box as a thoughtful homemade gift.
Common Mistakes to Avoid
- Not Measuring Ingredients Accurately: Ensure precise measurements for the best texture.
- Skipping the Chilling Step: Chilling is crucial for setting the bars properly.
- Overheating the Chocolate: Melt chocolate slowly to avoid burning.
Storing Tips for the Recipe
To keep your Healthy Homemade Butterfingers fresh:
- Refrigerate: Store them in an airtight container in the fridge for up to two weeks.
- Freeze: For longer storage, freeze the bars wrapped in parchment paper and then in a plastic bag. They can last up to three months.
Conclusion
In summary, making a Healthy Homemade Butterfingers Candy Recipe is not only simple but also a delightful way to indulge your sweet tooth without compromising your health. Enjoy this nutritious treat and don’t forget to share your experience in the comments below! Subscribe for more delicious recipes and updates!
FAQs
Q1: Can I use a different nut butter for this recipe?
A1: Absolutely! Almond butter or sunflower seed butter can be great alternatives.
Q2: How can I make these bars vegan?
A2: Use maple syrup instead of honey and ensure your chocolate is dairy-free.
Q3: Can I add other flavors to the bars?
A3: Yes! Try adding cocoa powder for a chocolatey twist or cinnamon for warmth.
Q4: What if the mixture is too dry?
A4: Add a teaspoon of water or more honey to achieve the desired consistency.
Q5: How can I enhance the chocolate coating?
A5: Sprinkle some sea salt or crushed nuts on top of the chocolate before it sets for extra flavor.
Healthy Homemade Butterfingers Candy Recipe
Ingredients
- 1 cup natural peanut butter (preferably unsweetened)
- 1/4 cup honey or maple syrup (for a vegan option)
- 1 teaspoon vanilla extract
- 1 cup protein powder (vanilla or chocolate flavor)
- 1/2 cup dark chocolate chips (70% cacao or higher)
- 1 tablespoon coconut oil (for melting chocolate)
- Pinch of sea salt
- Substitutions:
- Peanut Butter: You can substitute almond butter or sunflower seed butter for a nut-free option.
- Sweeteners: Agave nectar or brown rice syrup can replace honey or maple syrup.
- Protein Powder: If you prefer a non-protein version, you can use oat flour or ground almonds instead.
Instructions
Step 1: Prepare the Mixture
In a mixing bowl, combine the peanut butter, honey (or maple syrup), vanilla extract, and a pinch of sea salt. Mix well until smooth and creamy.
Step 2: Incorporate the Protein Powder
Gradually add the protein powder to the peanut butter mixture. Stir until fully incorporated. The mixture should be thick but pliable. If it’s too dry, add a teaspoon of water or more honey.
Step 3: Shape the Bars
Line a baking dish with parchment paper. Transfer the mixture into the dish and press it down evenly, ensuring it’s compact. Aim for about 1/2 inch thickness.
Step 4: Chill
Place the baking dish in the refrigerator for about 30 minutes to allow the mixture to firm up.
Step 5: Melt the Chocolate
While your mixture is chilling, melt the dark chocolate chips with coconut oil in a microwave-safe bowl. Heat in 30-second intervals, stirring in between until smooth.
Step 6: Coat the Bars
Once the mixture is firm, remove it from the refrigerator and cut it into bars or squares. Dip each piece into the melted chocolate, ensuring it’s fully coated. Place them back on the parchment-lined dish.
Step 7: Final Chill
Return the coated bars to the refrigerator for another 15 minutes until the chocolate is set.